
 myCSUSM


High Profile Meeting and Webinar Recommendations
Zoom Recommendations
Record for review later
Turn off local recording for participants
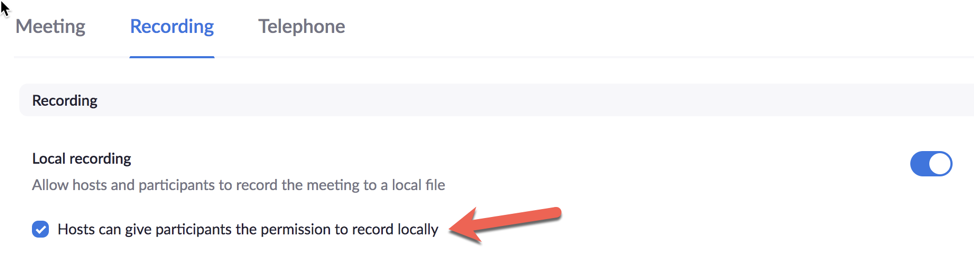
Note: remote users may simply record their screens using any of a variety of tools anyway. Be sure to include a disclosure that any recording is forbidden.
Turn off annotations
User settings
To enable annotation for your own use:
- Sign in to the Zoom web portal.
- In the navigation panel, click Settings.
- Click the Meeting
- Under Meeting (Basic), verify that Annotation is enabled.
If the setting is disabled, click the toggle to enable it. If a verification dialog
displays, click Turn On to verify the change.
Note: If the option is grayed out, it has been locked at either the group or account
level. You need to contact
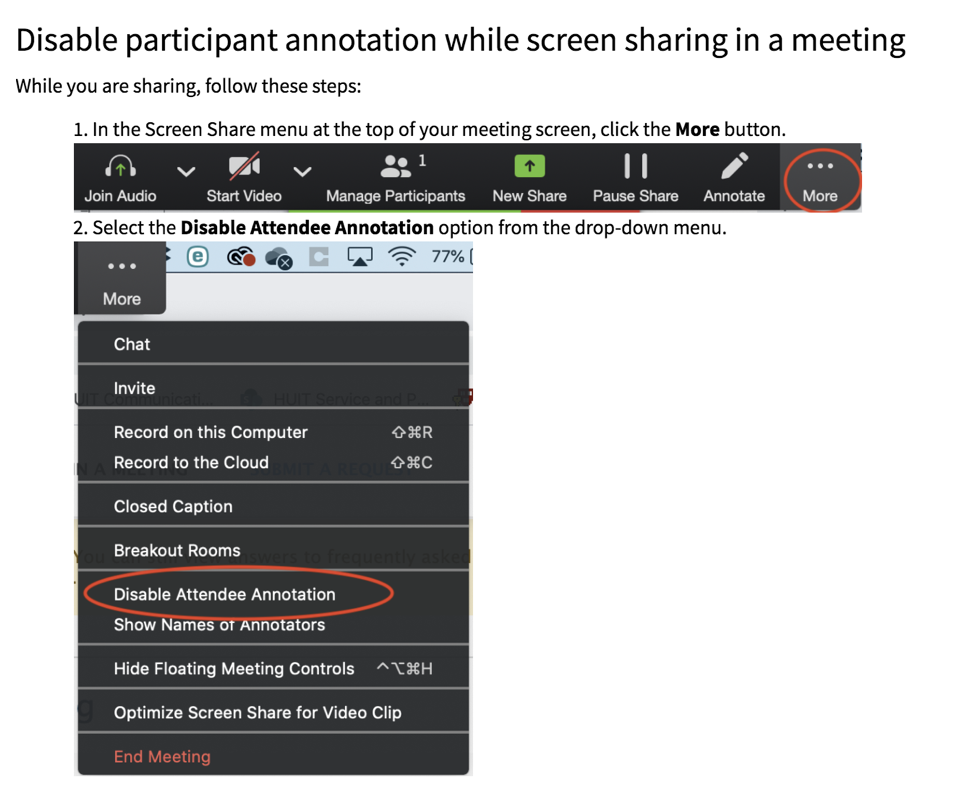
In a meeting
- In the navigation, select the More option
- Scroll down the list and select "Disable Attendee Annotation"
Don’t allow rename
User settings (In Meeting (Basic)
Turn off mic upon entry
User settings in the Zoom app
During the Meeting (mute all)
https://support.zoom.us/hc/en-us/articles/203435537-Mute-All-And-Unmute-All?zcid=1231
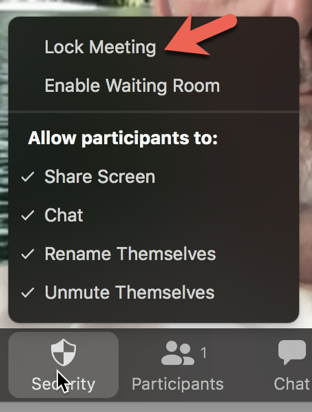
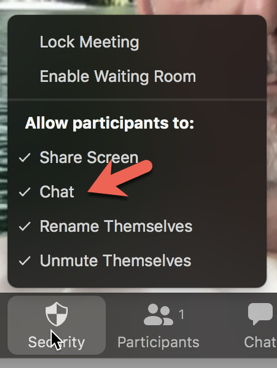
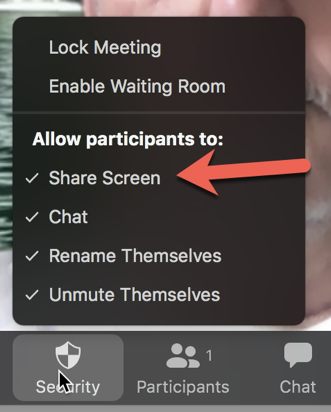
Don’t allow users to unmute (security button)
Lock Meeting
This works, but if a user is dropped for poor internet, they cannot get back in.
Don’t allow people back into the meeting (after being removed)
In the Zoom app, configure the User Settings

This is the default setting.
- Registrants for events
- There are auto accept and
- Password protect recordings
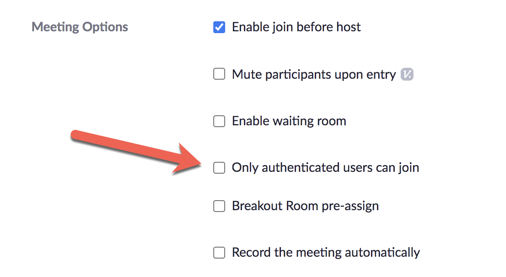
Authenticated users
User settings in the Zoom app

Meeting settings (app)
Meeting Settings (web portal)
Disable chat (during meeting)
Chat window:
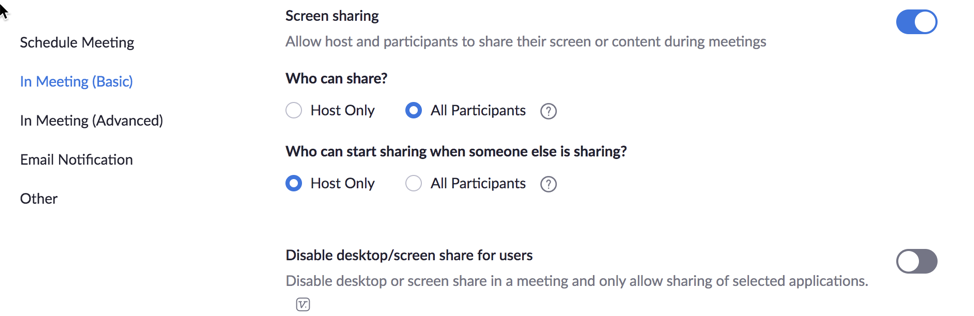
Disable screen sharing for participants
In user settings - affects all of the user’s meetings
During the meeting
In meeting - Share Advanced Options
Turn off participant video
The host cannot turn off all video in a meeting, but can turn off individual video
Webinar – Attendees do not have video and can only speak if allowed by host/cohost
Password protect meeting
This is ok as long as the meeting link is not shared with the password publicly
Report participants
https://support.zoom.us/hc/en-us/articles/360042791091-Report-a-participant-during-a-meeting
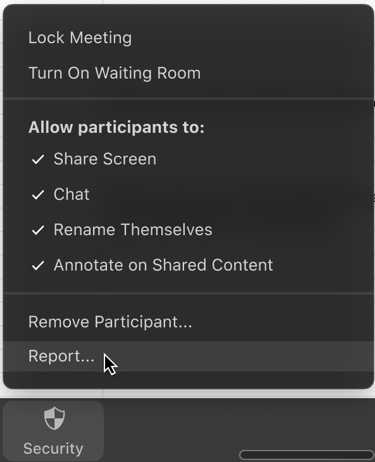
Remove participants
https://support.zoom.us/hc/en-us/articles/115005759423-Managing-participants-in-a-meeting?zcid=1231
Understanding Zoom Events and Security Settings
Zoom has 2 two type of meetings, regular and webinar. While they are similar there are some specific differences which can determine what type of meeting you will need. The participant limit in the CSUSM Meeting is 300 total participants, but if needed we have limited licenses for Large Meeting which allows 500 total participants. The CSUSM Webinar limit is 3000 total participants.
Webinar Differences
A webinar is great for having a panel and informational broadcasts.
Types of Participants in Webinars
There are 3 types of users in webinars. The host/co-host(s), panelists, and attendees. Only the host/co-host, and panelists can be on camera, and the host/co-hosts can always mute/unmute, panelists. Attendees cannot use video and are only allowed to speak if given specific permission. Attendees can also be promoted to panelist if they need to be on video and can be demoted back to an attendee.
Question and Answer
Webinars have both chat and Q & A. There are chat settings for no chat, chat to panelists, and chat to panelist and attendees. Host/Co-host and panelists can always chat with each other. Attendees are subject to the overall chat settings. Chat settings can be changed during the meeting. Q & A is a webinar only feature and has a few settings that can control what attendees see. Q & A must be turned on when creating the meeting. You can allow anonymous questions or not. You can set what questions the attendees see, answered questions only, all questions. If all questions are turned on there are also settings for attendees to upvote or comment, both can be turned on or off. Q & A is usually moderated by someone other than the host to keep the webinar on track with no interruption.
Share Screen
In webinars only the host/co-host(s) and panelists can share screen/annotate if turned on.
Meeting Differences
Types of Participants in Meetings
There are 2 types of users in meetings host/co-host and participants.
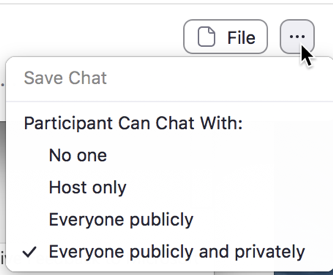
Chat
The chat settings in a meeting are no chat, chat to host, chat to everyone publicly, chat to everyone publicly and privately. Private chat allows participants to chat between themselves and no one else can view that chat including the host/co-host unless they are part of the private chat. The host/co-host can always chat privately to participants.
Participant Video in Meetings
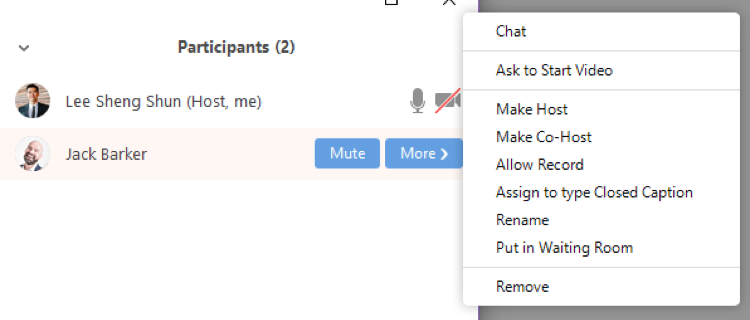
Participants by default can have their camera on or off. The host cannot turn on participant video but can ask them to turn on video via the participant window. The host can turn off participant video and the participant will not be able to turn it back on unless given permission by the host.
Breakout Rooms
Meetings have breakout rooms. This feature is not available in Webinar. Breakout rooms allow the host to break users into groups, this can be for collaboration, information sessions (think of a job fair or information fair with vendors). When setting up breakout room manually, you have a few option settings. You can move participants into breakout rooms automatically, creating random groups of a specified number. The host can, allow or not, for participants to return to the main session at any time. The host can set the breakout rooms to end automatically after a specified time and be notified when time is up. The host can have a countdown timer when closing the room, and adjust the countdown from 10, 15, 30, 60, and 120 seconds.
While breakout rooms are in session, the host can broadcast to all participants. The participants can ask for help. The host/co-host(s) can join and leave the rooms as needed to assist or facilitate with activities.
Share screen
In meetings the host can, allow or not, participants to share screen. Annotations can be turned off in meeting after the share has started. This can present a Zoom bombing issue when hosting a public meeting. Annotations can be turned off in the user settings of the host creating the meeting. Note that this affects all of the meetings so if you use annotations for other meetings you would want to turn it back on in settings. If you are allowing annotations the host or person sharing can show/hide participant names.
Registration
You can require registration in both meetings and webinar. There are two approval methods automatically and manually. Automatically Approve the Registrants will automatically receive information on how to join the meeting/webinar. Manually Approve the organizer must approve registrants before they receive information on how to join the meeting/webinar.
Notification sends an email to the host when someone registers.
Other options for both meeting and webinar are “Close registration after event date,” “Allow attendees to join from multiple devices,” and “Show social share buttons on registration page.”
The webinar has an extra option to “Restrict number of registrants.” You can also add pixel tracking in webinar registration for tracking visitors to your website or webinar advertisement.
You can also select the information you would like to gather from registrants such as first name, last name, email, along with other details like address, organization, etc. There is also a text field for questions and comments. You can also create custom questions for registrants to answer during registration. You can make any of the field required or optional except for First name and Email Address, they are always required.
Recording
You can always decide to record your meeting. Recording to the cloud is the preferred method because it takes the processing load off your computer and is the only way to record on devices. Cloud recording can also save the chat and will be displayed in the playback link along with transcripts. The host can edit the transcripts and chat before sharing the playback link.
Local recording records to the hosts computer and processes the file that does not have the chat or transcript options.
Security Settings and Considerations
Security is very important, but some settings can limit what you can and cannot do in a meeting.
Pre-meeting security
Decide how you will be sharing your link. Is it a private event or public event? Will you need a webinar or meeting?
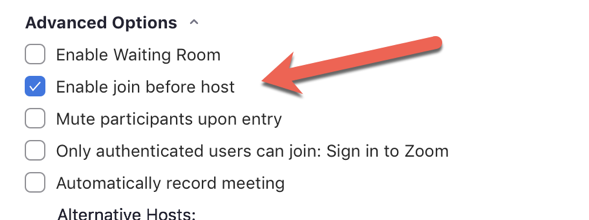
Security settings during meeting/webinar creation
When creating a webinar or meeting you can:
- add registration (default is on for webinar)
- require password
- enable mute participants upon entry (meeting only – attendees cannot speak)
- enable waiting room (meeting only)
For a more secure registration, use the manually approve option. While more time consuming, can avoid potential disruptors by not giving them the information automatically.\
Turn off screen sharing for participants
This will prevent all participants from sharing their screens. This can be done using the security button. The host can also set this in the share screen advanced button in the meeting.
Turn off annotations
In a meeting you can turn off annotations only after the sharing has started, this can expose the meeting to potential disruptions. You can turn off annotations by going to the Zoom controls in at the top of the screen and select more. There is a drop down with options to Disable/Enable Participant Annotations and Show/Hide Participants Annotations.
Password Protection
A password can be set protect your meeting. If you use auto registration anyone who registers will also have the password. Be mindful of where you share the meeting link and passwords should not be posted publicly.
Lock Meeting (In Meeting)
You can lock a meeting, if anyone loses connection they cannot rejoin. It blocks anyone from entering even if they have the proper password. This is a good method to keep people out but can prevent invited participant from reconnecting in case of network disruption.
Waiting Room (In Meeting, Meeting Creation)
The waiting room is a good measure that puts participants in a waiting room. The host can allow 1 at a time or allow everyone in at once. In larger meetings this could become time consuming and it is recommended to have a few co-hosts if you want to manage incoming users.
Renaming (In Meeting)
You can disable renaming. This prevents people from renaming themselves as a way to hide their identity. This can be enabled or disabled from the security button. There are many cases where you would want participants to rename themselves. Renaming can be used to add information such as pronouns, group name, or affiliation.
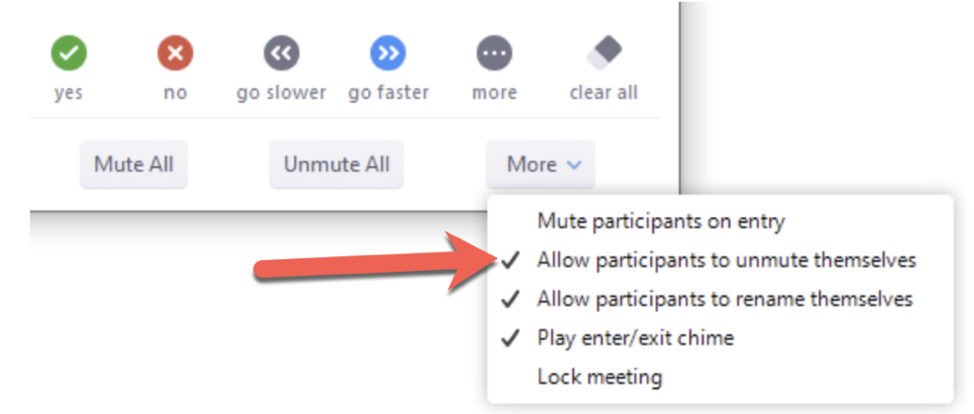
Unmute Themselves (In Meeting)
You can allow/disallow participants to unmute themselves. This is a great way to control who is speaking. Host/cohost can always mute/unmute themselves. If you are allowing people to talk using this function along with raise hand works well. Make sure you unmute before lowering the user’s hand.
Turn off participant video (In Meeting)
In a webinar only host, cohost(s), and panelists can have video on. In meetings participants can turn their video on or off initially, but if the host/cohost(s) turn off video for a participant they cannot turn it back on unless given permission.
Disable Chat (In Meeting/Webinar)
Chat can be completely disable or directed. See chat settings above.
Authenticated Users
The authenticated users setting only allows users that are members of the CSUSM Zoom account. For the user to be allow into the meeting they must be signed into the Zoom desktop / device app and licensed in the CSUSM Zoom account.
Things You Can Do During a Meeting
While the best scenario is to keep disruptive persons out of your meeting to begin with, if your meeting is being disrupted, there are things you can do to minimize the disruption.
Audio
A participant could be saying something or simply making noise. You can mute one person or everyone in the meeting. You can also prevent users from unmuting themselves.
- Remove participants’ ability to unmute themselves.
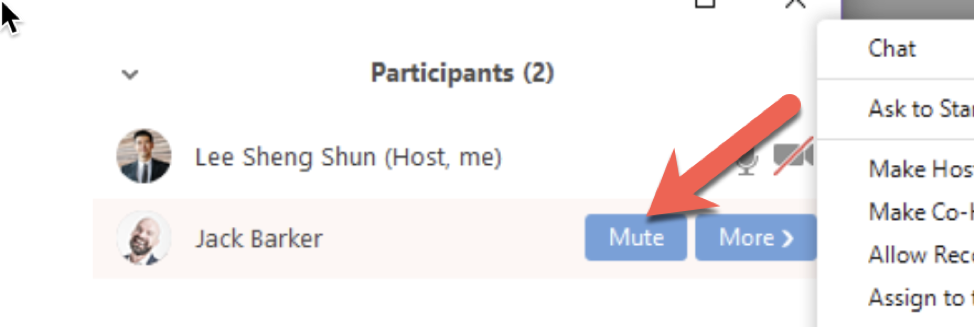
- Mute the person - The Mute button next to each person’s name in the Participants window.
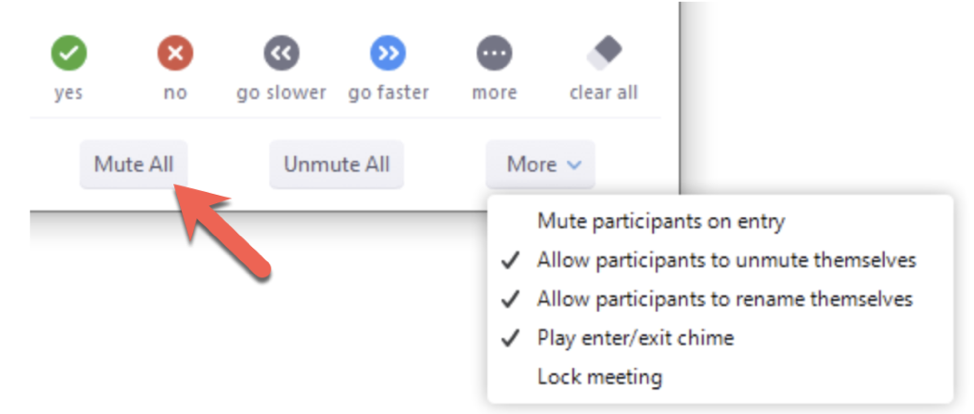
- Mute everyone - If you aren't sure who is speaking, use this feature to mute everyone. The Mute All button at the bottom of the Participants window. At this point you, as Host, are the only person that can unmute someone.
Video
A participant could have something offensive in their webcam video or in their virtual background. You can:
- Mute that person’s video.
The small camera icon next to each person’s name that allows you to turn their camera off.
Note that participants can turn their video back on. You cannot prevent this.
Screen Sharing
One of Zoom’s basic capabilities is screen sharing, but someone may attempt to share something objectionable. You can:
- Stop anyone from sharing their screen unless you allow it.
Advanced Sharing Options under the Screen Sharing menu at the bottom center.
With this selected, only you – the host – can screen share.
This can also be done in the Security menu, available at the bottom of the screen.
- Stop a screen share already in progress.
While someone is sharing, this button is at the top of the screen. Click it to stop the share.
Kicking Disruptive Persons Out of Your Meeting
You can put a disruptive participant out of a meeting completely:
- Removing a person from the meeting.
Pop up the More menu next to a person’s name in the Participants window and choose Remove.
- Preventing people from reentering after you have removed them.
This tutorial shows you how to prevent people you have removed from meetings from reentering: