
 myCSUSM


Checklist for Updating an Imported/Restored Course
If you have not yet imported or restored content, please see our help guides Import Course Content or Backup and Restore Course Content.
Why do this?
If you import or restore content from another course there are a few things you will want to do to get your course ready before making it visible to your students.
- Set the dates for your activities
- Delete old or unused resources and activities
- Check all URLs to make sure they are still valid
- Ensure topics and items have correct visibility
Optional:
- If you are using Turnitin Assignments
- If you are using the Q&A Forum type: post your Question(s)
- If you are using Groups: delete old group shells and create new groups
- If you are using Respondus LockDown Browser: activate your LockDown Browser Dashboard
Set the Dates for Your Activities
To bulk edit activity dates:
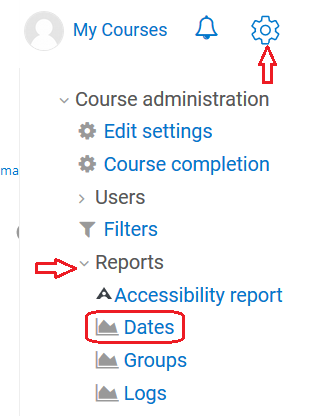
- Click on the gear icon in the upper right to open the Course Administration. Click on Reports then Dates.
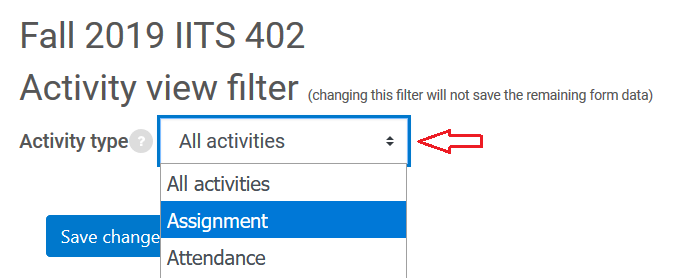
- Wait for the page to fully load. From the Activity Type dropdown, select the activity type you want to set the dates for first (Assignment, Forum, Quiz, etc.).
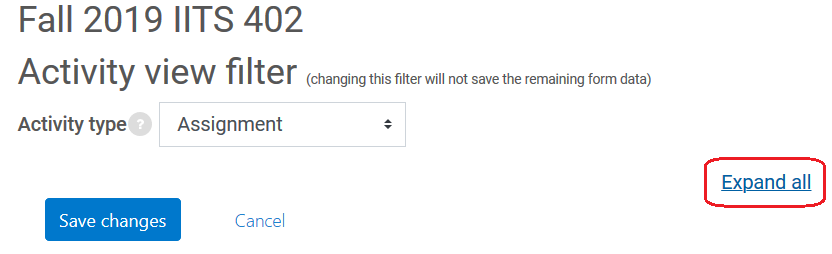
- Wait for the page to fully load. Click Expand All on the right hand side.
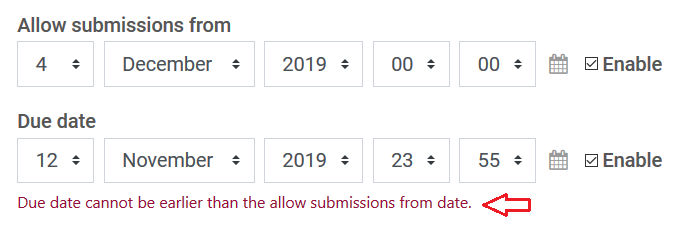
- The date settings for every item of the selected activity type in the course will be displayed on this page. Set the desired dates for each item.
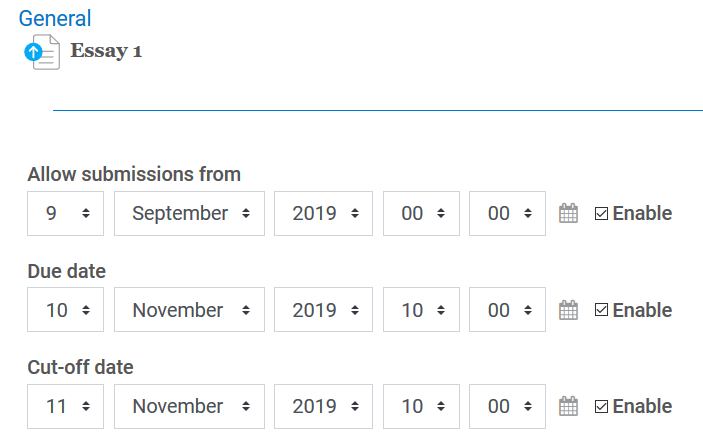
- When finished, click Save Changes. If after you save you are brought back to the same page (with everything expanded) it means there was an error in one of the settings. For example, a due date being before the start date. Scroll down to find the error and fix.
- Repeat steps 2-5 for the next Activity Type.
Delete Old or Unused Resources and Activities
If you import or restore an entire course you will want to delete the old or duplicate items (like the old syllabus and any extra Announcement/News forums) and any resources and activities you are no longer using. It is best to delete unused items since simply hiding these items does not remove the points from the gradebook course total, plus they can clutter up your course and make it harder to navigate. Don't worry, you can always import just these items again from your other course if you change your mind later.
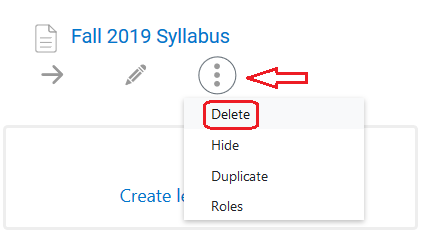
To delete an item, click the More icon (three vertical dots) below the item. Then click Delete.
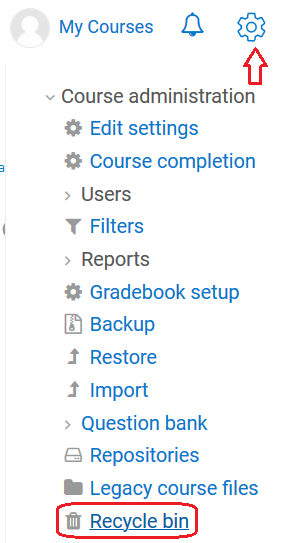
While the item will be removed from the module/topic, it won't be completely deleted from the course. About an hour after you click Delete the item will appear in the Recycle Bin where it will remain for two weeks before it is completely deleted from the course. You can restore the item from the Recycle Bin at any time during these two weeks. To do so, click the gear in the upper right to open the Course Administration. Click on Recycle Bin.
Find the item in the Recycle Bin (again, it will take about an hour after deletion to appear in the Recycle Bin and will only remain there for two weeks.). Click the Restore icon to return the item to the module/topic where it was when it was deleted.

Check all URLs
Prior to every term you will want to check all of your URLs to ensure they are still valid and either update or delete if they are not. This includes links to library content (especially the Media Library), videos, help guides, and external links.
- External URLs: simply clicking on the name should open the link. To change the link click the pencil under the item. Update the URL in the External URL box.
- Media Library content: if you imported a link to Media Library content you will want to check with the Media Library to make sure the content will still be active for this term.
- Links within text boxes: We do not recommend linking to files within text boxes (descriptions of resources/activities, Pages, Labels, etc.) because when you import/restore the content into a new course the link still references the original course, which you have access to but students do not. We recommend either adding these files to the module on your course homepage or copying the content of the file and pasting it into the text box. Links to external sites within text boxes do not have this problem, but should still be checked each term to ensure the URLs are still valid.
Ensure Topics and Items Have Correct Visibility
When you import or restore content from another container, the visibility of items is transferred over as well. So if a module/topic or item is hidden in the other container, it will be hidden in the new container.
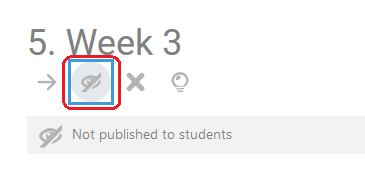
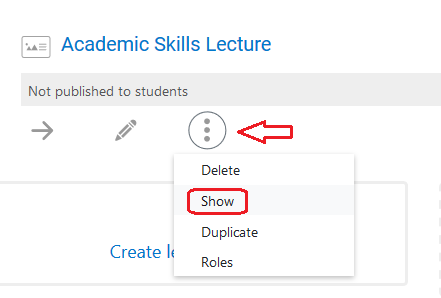
If the module/topic is hidden the message "Not published to students" will display under the module/topic name. To hide or show a module/topic, click on the eye icon underneath the module/topic name.
If the item is hidden, the message "Not published to students" will display under the item name. To hide or show an item, click on the More icon (three vertical dots) underneath the name of the item. If it is currently hidden you will click Show. If it is currently visible, you will click Hide.
You can also temporarily switch your role to Student to see your course from their perspective. Please reference our help guide "View as a Student" on how to do so.
If you are using Turnitin Assignments
Imported Turnitin Assignments can sometimes encounter major errors. To avoid these errors you will want to delete the imported Turnitin Assignments and recreate from scratch.
If you are using the Q&A Forum type
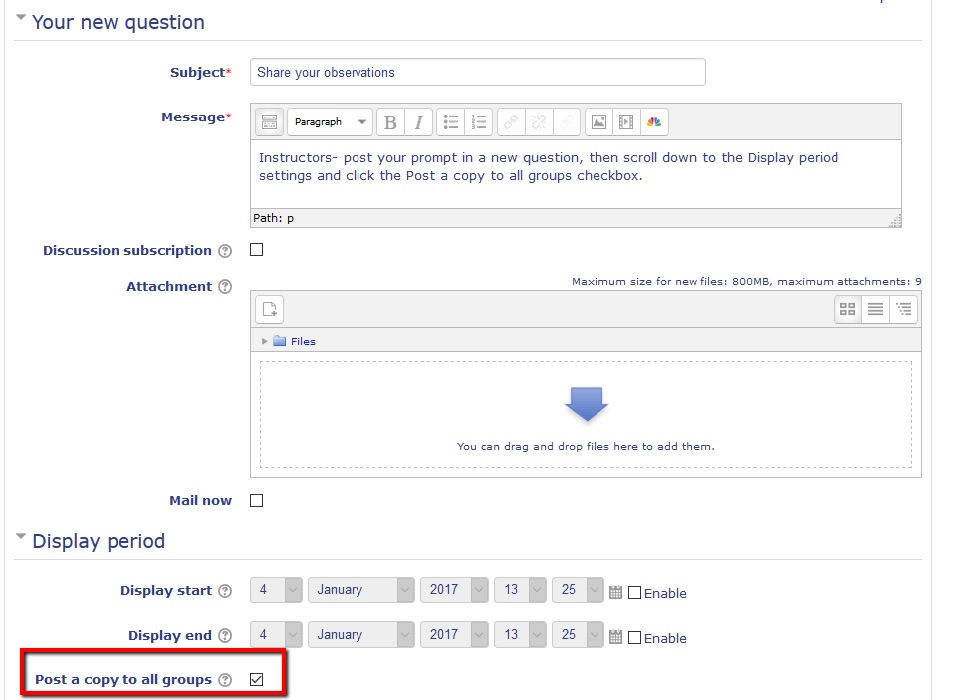
If you’re using the Q & A Forum type you need to post your question/prompt as these do not copy over from previous semesters.
Go to the forum. Click the "Add a new question" button. Enter the Subject and Message. If you are using Groups and have already set up the groups, you will need to check the box for "Post a copy to all groups" in the Display Period section. Click "Post to forum" when finished.
If you are using Groups
If the course you imported or restored from had groups (and groupings), the empty group shells and groupings will be brought over as well. If you will be creating new groups (recommended) you will want to delete these empty group shells. To delete, simply select the groups and then click "Delete selected groups." Please see our help guide "Create Groups and Groupings" for assistance creating groups and groupings.
Once you have set up the groups and groupings, you will want to make sure all appropriate activities are set to groups. For an Assignment: click the pencil icon underneath the name. In the section Group Submission Settings, set "Students submit in groups" to Yes. If you have more than one set of groups, set the Grouping. Go to the Common Module Settings section and for Group Mode choose Separate Groups. Again, if you have more than one set of groups, set the Grouping. Save. For a Forum: click the pencil icon underneath the name. In the section Common Module Settings, set Group Mode to Separate Groups. If you have more than one set of groups, set the Grouping. Save.
If you are using Respondus LockDown Browser
If you import or restore quizzes that require Respondus LockDown Browser you must activate the LockDown Browser Dashboard before students begin taking any quizzes that require LockDown Browser. Failure to do so can cause problems for students attempting to take the quiz. To do so:
- Click on Course Dashboard (on the right hand side under the Contents area).
- Locate the Respondus LockDown Browser block and click on the Dashboard link.
- The initial page will have links to information and videos on LockDown Browser. Click "Continue to LockDown Browser" in the lower right.
- A pop-up message will display informing you that you have successfully activated your LockDown Browser Dashboard.
- The Dashboard will list all of the quizzes in your course. Ensure the appropriate
quizzes have Required listed for LockDown Browser and, if desired, Monitor.
If you update a quiz that requires LockDown Browser or further import content from another course container, we recommend checking your LockDown Browser Dashboard to ensure everything is still set correctly and there are no Errors that need to be fixed.
For more information on Respondus LockDown Browser please see our help guide Respondus LockDown Browser and Monitor (Instructor Guide).