myCSUSM


Azure Information Protection
by Jeroen Barendse
Updated February 28th, 2019
The need for encryption...
A crucial part of any successful modern business involves the collection and storage of customer data. As stewards of the data we collect, every member of the campus community has a responsibility to ensure that our customer's data is adequately protected. In the context of Information Security, this means that we are ensuring that files are available when needed, remain unaltered and are not viewable by unauthorized individuals. Please note that protected data (as defined by the CSU Data Classification Survey) should never be shared outside our organization.
We at the Information Security Office want to make sure that you have the tools you need to fulfill this responsibility, so we have begun campus-wide distribution of a new file protection software called Azure Information Protection (AIP).
Why AIP?
Unlike traditional file encryption software, AIP allows you to restrict access to files by email account.
This means no more pesky passwords to remember, and managing access is as simple as typing an email account.
In addition, AIP ensures that your files are protected wherever they go, because unlike traditional file encryption solutions, AIP adds the protection to the file and not the storage location.
How Do I Get it?
Azure Information Protection is available through Software Center for systems running Office 2016 and older. Software Center is an application installed on all campus computers that allows you to download and install approved software. Instructions regarding Software Center. If you have Office365 installed, AIP is included already!
If you receive a protected file and are unable to open it, t
How Does it Work?
In order to protect a document, you must be on a Windows computer. Mac computers can read protected documents shared with them by other people, but can't add protection to a document. To view a protected file on a Mac, download the Azure Information Protection Viewer.
There are two ways of protecting a document with AIP.
Right-Click Method:
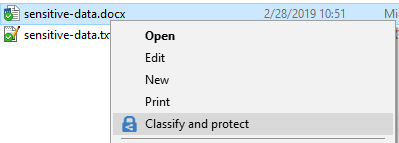
- In File Explorer, right-click a file that you wish to protect and choose "Classify
and Protect":
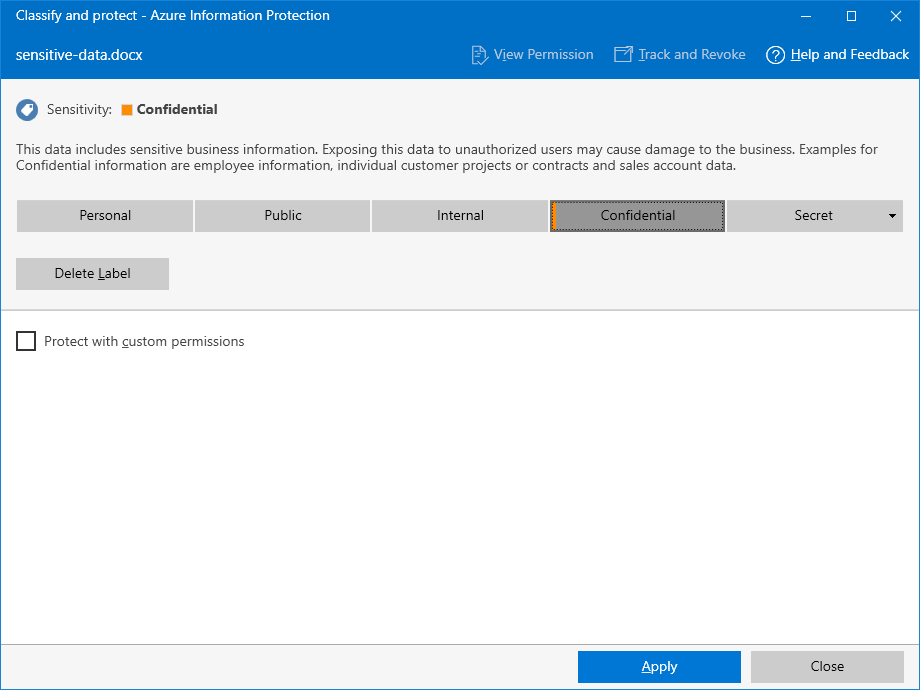
- In the Azure Information Protection dialogue box, you can give your file a label to
classify how sensitive the data it contains is (Note - only Microsoft Office files
can be given a classification label):
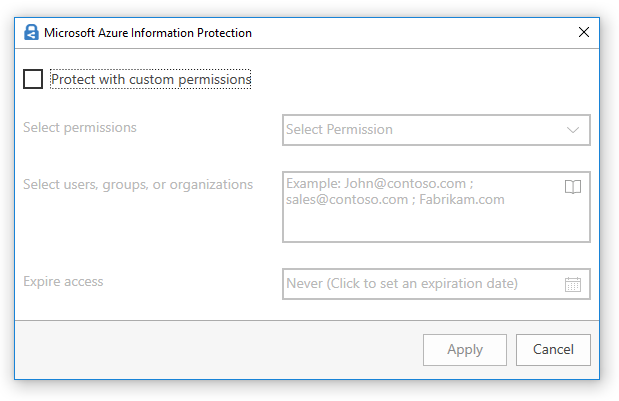
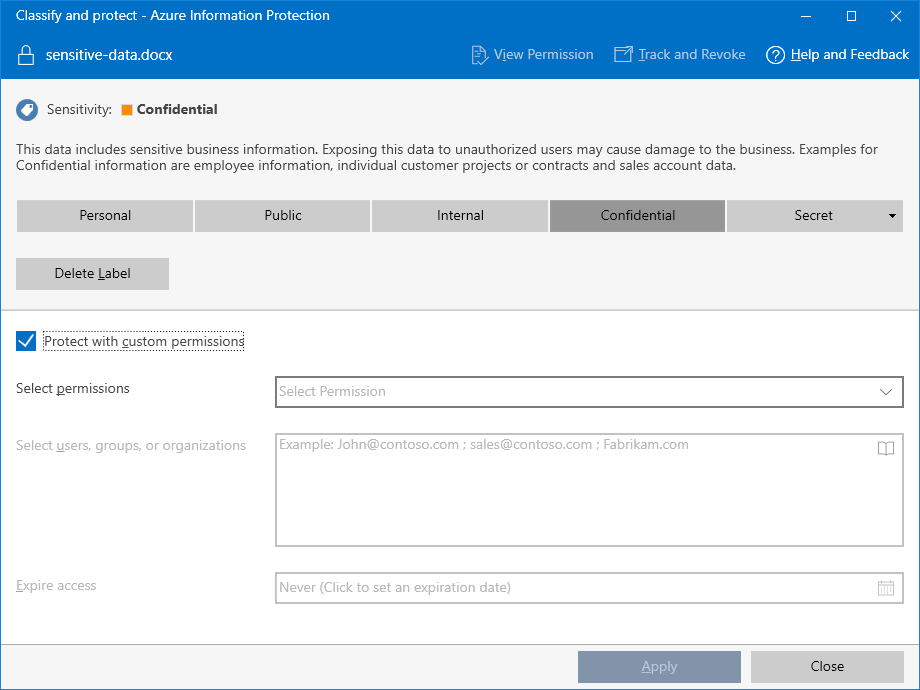
- Click the "Protect with custom permissions" checkbox, and some new fields will appear:
- In the "Select Permissions" drop-down menu, choose how you want to restrict access
to the file:
- Viewer – View Only
- Reviewer – View, Edit
- Co-Author – View, Edit, Copy, Print
- Co-Owner – All Permissions
- Only for me
- Enter the email address(es) of the individual(s) to whom you want to grant access in the "Select users" field. Separate multiple addresses with a semi-colon.
- You can automatically revoke access on a specific date by entering a date in the "Expire access" field
- Click "Apply" and the document is now protected!
- Office documents protected with AIP display a notification below the Office Ribbon menu informing the user that the document has been protected
- Non-office documents protected with AIP will have an updated file extension to denote that they are protected
Protect Within Office:
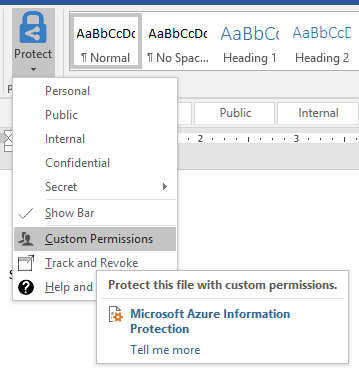
- Once you have installed Azure Information Protection, you will see the AIP Classification
menu below the Office Ribbon menu. Click on the appropriate label to classify the
sensitivity of the data this document contains:
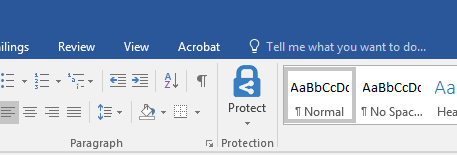
- To protect the document, in the Office Home Ribbon, find the "Protection" section:
- Click "Custom Permissions", and the Microsoft Azure Information Protection dialogue
box will appear:
- Click the "Protect with custom permissions" checkbox:
- In the "Select Permissions" drop-down menu, choose how you want to restrict access
to the file:
- Viewer – View Only
- Reviewer – View, Edit
- Co-Author – View, Edit, Copy, Print
- Co-Owner – All Permissions
- Only for me
- Enter the email address(es) of the individual(s) to whom you want to grant access in the "Select users" field. Separate multiple addresses with a semi-colon.
- You can automatically revoke access on a specific date by entering a date in the "Expire access" field.
- Click "Apply" and the document is now protected!
- Office documents protected with AIP display a notification below the Office Ribbon menu informing the user that the document has been protected.