
 myCSUSM


Mountain Biking 101
Maybe you’ve picked up mountain biking as a new hobby during quarantine, or maybe you’re an experienced mountain biker looking for new tips. Whether you’ve just picked up your sparkly new bike or are dusting off your old faithful, Outdoor Adventures has got you covered. Below you will find a few tips and tricks to get you out riding!
Prepping your Mountain Bike for Riding
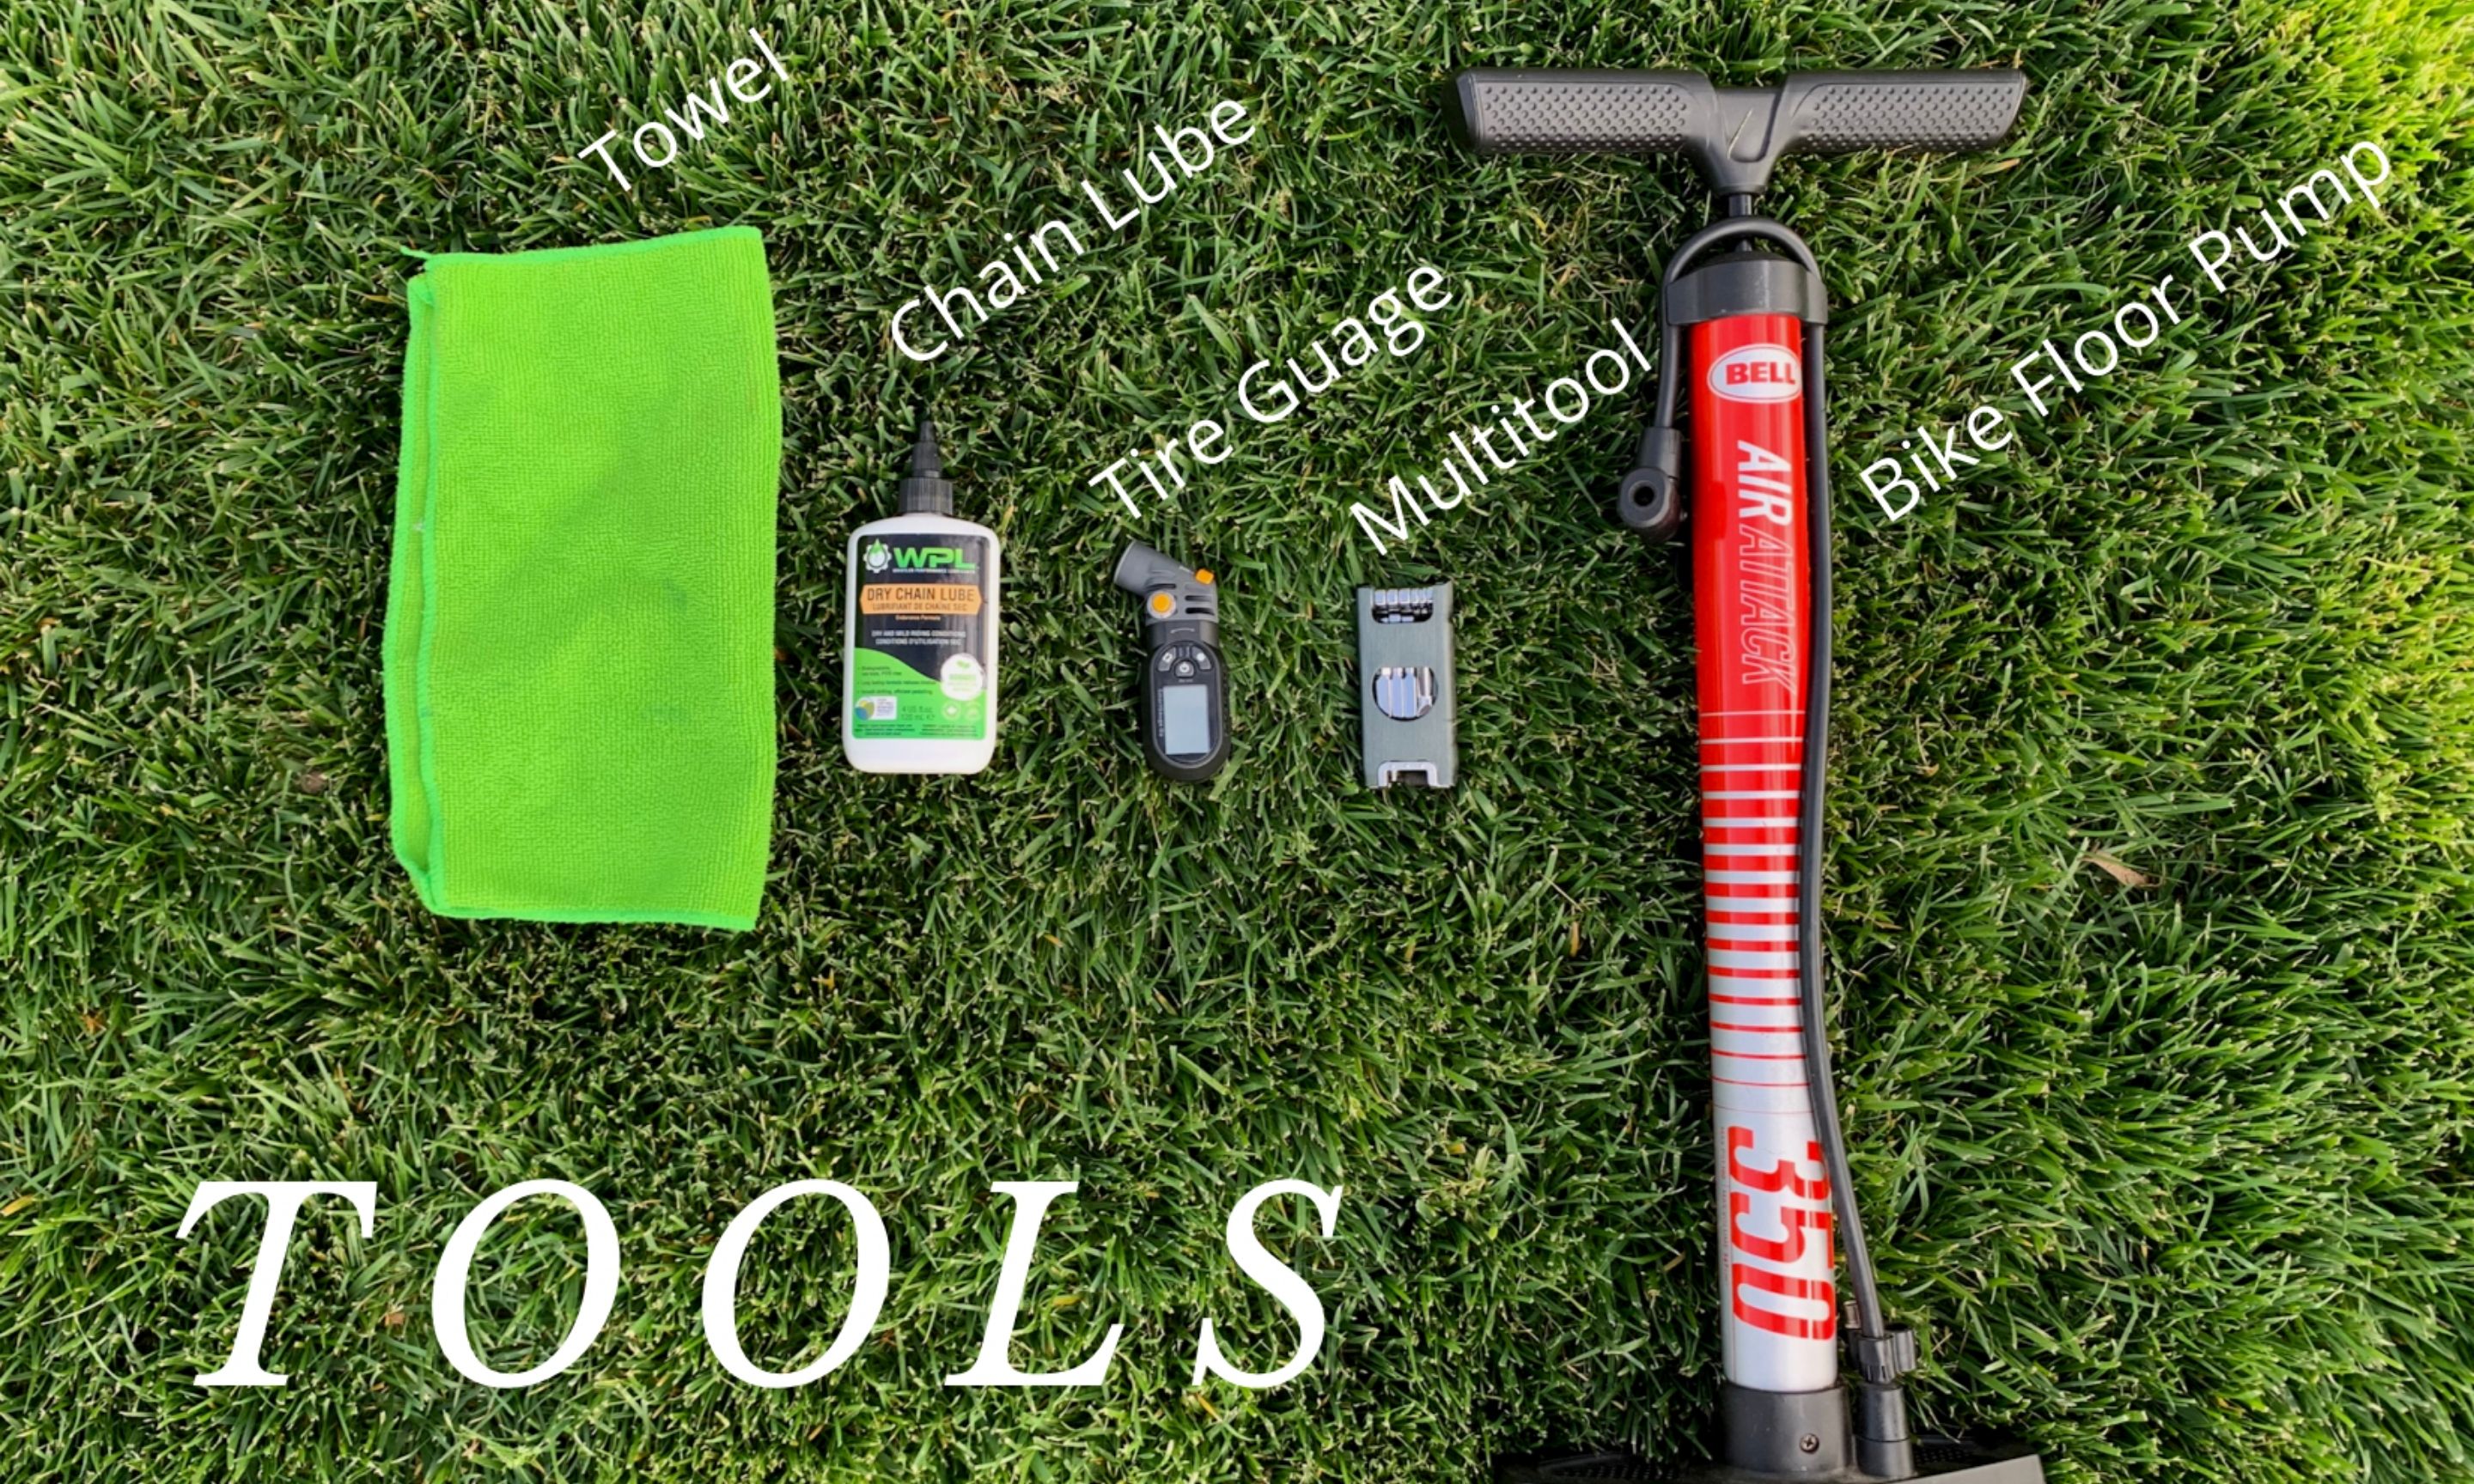
Okay so now that you’ve got your bike, it’s time to get it ready for the trails. Every great ride begins with reliably setting up your bike. Learn how to quickly and properly set up tire pressure, seat post height, controls position, and regular maintenance. All the bike service tips below will only require a few basic tools and supplies:
- Towel
- Chain Lube
- Tire Gauge
- Multitool
- Bike Floor pump
Tire Pressure
The way your mountain bike feels on the trails is heavily dependent on your tire pressure. The only thing that contacts the ground when you are biking is just a few square inches of surface area under your rubber tires. To maximize grip and feel, your bike’s tire pressure should be carefully checked.
Things you will need:
- Bike floor pump
- Tire pressure gauge
*If you do not have these supplies, take a visit to your local bike shop
Before every ride it is ideal that you check your tire pressure. Now, what is the perfect tire pressure? Well, it really depends on a whole slew of factors. How much the rider weighs? What type/size of tires you’re running? How wet or dry is the dirt? Not to worry, we’ll get you sorted out and you’ll be an expert on tire pressure by the end of this. For every person, air tire pressure varies but typically mountain bike tire pressures range from 28-23 PSI. If all you’re concerned about is getting out to ride set your pressure to 25 PSI its quick and easy to remember. However, it may not be the optimal tire pressure for you. A tire pressure that is too high will decrease the perceived “grip” the tire has on the dirt. A tire pressure that is too low can result in damage to your bikes wheel. Don’t worry, there’s a simple process to figure out the pressure for you.
Begin with checking your current tire pressure, chances are it's pretty low. The seal on tires aka “the bead” where the tire locks onto the metal rim is not always airtight. Thus, air will tend to leak out. Here’s how to properly get your bike ready for the trails.
- Check the current tire pressure with a tire pressure gauge.
- If low, fill your tires up to 28 PSI with your bike floor pump.
- Check to see if any air is leaking from the tires, do this by listening for escaping
air. It’ll sound like a “hissing” noise.
- Commonly, you will find that air will escape around the tire valves. If it is leaking tighten down the locking nut at the base of the valve body. That should stop the leak.
- Okay, so now there are no leaks, and your tires are at 28 PSI.
- Bring your tire pressure gauge and take your bike out to the trails and play around with tire pressures.
- Begin with 28 PSI and feel how the tires grip the dirt.
- Now lower your tire pressure by 1 PSI and ride the same section of trail.
- Feel how the tires grip the dirt. Repeat.
- Be sure not to go below 23 PSI.
- Somewhere in the range of 28-23 PSI will be the pressure best suited for you!
Congratulations! You've found your ideal tire pressure! Quick, write it down before you forget. Now that you found a tire pressure that suits you, you can set it to that number each time before you go out and ride!
Adjusting Seat Post Height
Your bicycle’s seat post height is crucial to how comfortable you feel on your bike. Also, a properly adjusted seat post height allows you to pedal with the most efficiency. All mountain bikes have some way to adjust your seat post, some have a collar with a hex nut, some have a quick adjust lever, and some have a hydraulic dropped seat post.
Here’s a quick and easy guide to adjusting seat post height. You will need:
- A friend to hold your bike
- A set of hex wrench aka Allen wrenches or Bike Multitool
- Proper foot position on the pedals
- The shoes you wear to mountain bike
- Torque wrench (optional)
*If you do not have these supplies, take a visit to your local bike shop
Proper foot position on the pedals ensures you stay stable and in control of the bike on rough terrain. The ideal position is having the balls of your feet on the pedal surface. Not your toes, not your arch, not your heels, the balls of your feet. Placing the balls of your feet on the pedals ensures that you have adequate ankle mobility for each crank of the pedal. Your ankles will also act as shock absorbers when biking over rocky sections. Now that you’ve mastered foot position, we can begin adjusting your seat post.
Adjusting your bikes seat post height will help you feel more comfortable on your bike and it will also make your pedaling more efficient when biking up those steep hills. Now that you’ve gathered everything you need, let’s get started.
- Begin by testing your current seat post height.
- Put on the shoes you use for mountain biking.
- Bike in a straight line and have your friend watch your legs.
- While you are biking, your legs should be almost straight at the bottom of each crank
of the pedal.
- If your knees are bent more than a few degrees at the bottom of each crank you will need to adjust your seat post height.
- If your knees are completely straight, you will need to adjust your seat post.
- To adjust, loosen the hex bolt on the seat post clamp and raise the seat by a few centimeters.
- Now tighten up the hex bolt again on the seat post clamp.
- Have a friend hold the bike and you sit on it
- Rotate the pedal to the lowest part of the crank.
- Stay seated and place your heel on the pedal.
- If your seat post is at the right height, your legs will be completely straightened
out when your heels are on the pedals.
- If it is too high, your heel will not reach the pedals.
- If it is too low, your knees will be bent when your heels are on the pedals.
- Play around with the seat post height until your legs are completely straightened out when you are seated and have your heels on the pedal.
- Be sure to properly tighten the hex bolt on your seat post clamp. About 7-8 nm if you have a torque wrench. If not, lightly turn the hex bolt until it stops rotating and firmly turn your hex wrench ¼ turn. (360 degrees = 1 turn, 90 degrees = ¼ turn)
(Insert photos)
Now that you’ve found your ideal seat post height, when you go back to proper foot position with the balls of your feet on the pedal surface, you will find that your leg will be at the optimal position to pedal. Congrats! Now get out there and ride your bike!
Finding the Right Position for your Controls
What are controls you might ask? Well, controls are all the levers and switches you have on your bike’s handlebars which include, front brakes, rear brakes, shifter, and dropper post lever (if you have a dropper on your bike). Having the right position of your controls helps YOU stay in control of your bike. It will also save you from soreness and injuries. If you just bought your bike or are experiencing discomfort in your wrists; your controls may not be adjusted to your needs.
Here’s what you need to adjust them:
- A friend to hold your bike.
- Depending on your bike:
- A set of hex wrenches aka Allen wrenches
- Or a set of screwdrivers
- Or a Bike multitool
- The shoes you wear for mountain biking.
*If you do not have these supplies, take a visit to your local bike shop
Follow these steps to quickly get you set up with the proper control positioning.
- Slightly loosen the bolts on your bike’s brake and shifter mount clamps just enough to where you can rotate the mount up and down, but not too much where the mounts freely fall due to gravity.
- Put on the shoes you use for mountain biking.
- Have a friend hold the bike while you stand on the pedals.
- Make sure your pedals are level, as in your left foot and right foot are at the same height off the ground.
- Now that you’re standing on the pedals, straighten out your arms and wrists.
- Place your pointer finger on the brake levers.
- Adjust the position of the brake and shifter mounts until you form a straight line from the tip of your pointer finger to your shoulder.
- As in, your pointer finger, wrists, elbow joint, and shoulder should be on the same plane in a straight line.
- Continue adjusting until you’ve reached the desired position.
Yay! Now you’re ready to go ride! Hopefully these adjustments will help you feel more comfortable on your bike and put you in the best position to have confident control over your bike!
Lubricating Your Mountain Bike’s Chain
Your chain is what links the power generated by each turn of the pedal and the rubber that meets the ground. Even under normal circumstances, your bicycle’s chain has to withstand an immense amount of force. A rider that weights 140lbs, on average generates 109 nm of torque (80ft-lbs). That’s a lot, and like many other components on your it requires regular maintenance. Lubricating your chain is a simple way to prolong the lifespan of your chain and ensure efficient movement.
Here is what you will need:
- A friend to hold your bike, or a wall to lean it against
- A paper towel or rag
- Bicycle chain lube (wet or dry depending on conditions)
*If you do not have these supplies, take a visit to your local bike shop.
Okay, now what is the difference between wet lube and dry lube? Essentially, they work do the same thing. But each is better suited for given trail conditions. If your trails are dry and dusty, use dry chain lube. If your trails are wet and muddy, use wet chain lube. Dry chain lube is still applied as a liquid but then dries leaving a “dry lubricant” to protect the chain. A dry lube will help keep the dust and grit from sticking to the chain and prematurely wearing it down. A wet lube goes on as a liquid and remains a liquid on the chain. Wet lube prevents mud and water penetrating the inner bearings of the chain. Thus, protecting it from rusting.
Here is the process I go through to lubricate my chain. I typically lubricate my chain every 3 rides and after each time I wash my mountain bike. (It is important to lube you chain after washing your bike to prevent rust)
- Ask a friend to hold your bike or lean it against a wall with the chain facing you.
- Find the master link of the chain (the clip that holds the chain together)
- Finding the master link will help you keep track if you’ve lubricated the whole chain.
- Start dripping chain lube on the master link and rotate the pedals by hand so that the chain will move.
- Stop applying lube once you’ve reached the master link again.
- Wipe the excess chain lube away with a rag or cloth.
- Too much lube will result in dirt and grit sticking to the chain.
(Insert Pictures)
A well lubed chain will have you on your way to pedaling into the hills! Happy riding!
Finding Trails to Ride
Sometimes the hardest part of biking, it just finding trails. Maybe there isn’t a whole lot of trails in your area, or maybe you’ve ridden all the popular trails and are looking for something different. Either way, we’ve got you covered. There are multiple ways to find trails in your local area, here are a few:
AllTrails (good for beginners looking for new trails)
The AllTrails app is very popular amongst hikers and backpackers; and can be a very useful tool for navigating trails. This is a free app available on IOS and Android that can help you find new trails and learn vital information about them. This app is mostly for hiking trails, but there is a filter you can use to find mountain biking trails. Be mindful though, many of these trails are multiuse. Meaning hikers, mountain bikers, horseback riders, and even motorcyclists may use these trails.
This app will tell you pretty much everything you need to know about a certain trail. The mileage, the difficulty, the elevation change, directions to get to the trailhead, local weather, your location, and reviews/tracks from people who have done it before. The app also offers a premium version with a few extra features like downloadable maps and map layers.
Be sure when selecting a trail on AllTrails that mountain bikes are allowed on trail. Please follow local rules and restrictions to keep hikers and bikers happy.
TrailForks (the bread and butter MTB app, most commonly used)
The TrailForks app is the most widely used app for mountain biking. Similar to AllTrails, it will tell you all the information about the trail. Such as mileage, difficulty, ave. time to complete, elevation change, your location, trail closures, the track and reviews from other riders. The TrailFork app will serve almost all of your MTB navigation needs.
This app is specifically designed for mountain biking and only shows trails open for mountain biking. The free version of the app allows you to select a certain area and download that portion for offline maps. The premium version allows you to download trail info for entire states. This app is all you need for the avid mountain biker.
MTB Project
This app created by REI is akin to TrailForks, they both do similar things like providing info on trails in your area. They differ in the amount of area you can download for offline use. Another key difference, is the trails listed on the app. Some trails will be listed on TrailForks and not on MTB project and vice versa. In general, it is another good app to use to help you navigate and find trails.
Other Helpful Resources
Visit Your Local Bike Shop
Go where the pros go! Your local bike shops often employ very experienced mountain bikers and maybe even professional mountain bikers, they can be a rich source of local knowledge. Next time you’re in the shop buying new parts or having your bike worked on, ask them about their favorite local trails. You may find new trails and maybe even gems only the locals know. It’s a nice way to expand your knowledge and develop a relationship with the bike shops that support you.
YouTube.com
Yes, Youtube. If you know the name of the area you want to go check out, many times you can find the exact trail you are looking for. Often local cyclists will record videos of an entire trail with their GoPros or action cameras. This can be helpful if you plan to do difficult trails and want to know a little more info about them before you commit to them.
Riding Etiquette
Trail etiquette is something we should all keep in mind when we’re out riding our mountain bikes. It goes beyond just being courteous to those around you. Mountain biking is an entire culture, complete with cultural norms. Here are a few things to keep in mind when you are on trail:
Leave No Trace (LNT)
LNT are principles that ensure the health and safety of both people and the environment. In total, there are seven Leave No Trace principles. Each of them serves as guidelines that are easy to follow and ensures a beautiful place for visitors. Below are the seven key LNT principles:
- Plan Ahead
- Travel and Camp on Durable Surfaces
- Dispose of Waste Properly
- Leave What you Find
- Minimize Campfire Impact
- Respect Wildlife
- Be Kind to Other Visitors
Visit Leave No Trace to find out more.
Going off Trail
Going off trail is always discouraged, but in some places, it may mean life or death. This is especially true in deserts like Sedona and Moab. Not only do some of these places have steep cliffs that might result in a dangerous fall; but these places also have fragile microbiomes called Cryptobiotic Soil. Going off trail may be dangerous for your safety and the safety of Cryptobiotic Soil. Always follow trail signs/markers and stay on course.
Cryptobiotic soil is commonly found in many high deserts like Joshua Tree, Sedona, Moab, and parts of Utah. The soil is home to trillions of microorganisms that coexist in what’s called a microbiome. Cryptobiotic soil can take decades and even centuries to form but can be destroyed in seconds. These microbiomes are extremely fragile and going off trail can wipe them out forever. Simply rolling over them with your bike or stepping on them can result in irreversible damage. Please protect the natural wonders of this world and stay on trail.
Trail Direction / Right of Way
On occasion, trails may be unidirectional or bidirectional. Meaning that some trails only allow travel one way and others both ways. This is done mainly to protect the safety of mountain bikers. Having one-way trails reduced the risk of head on collisions. Be mindful of the trails you visit; they may be one-way.
On trails who has the right of way? Most commonly the mountain bikers pedaling uphill have the right of way, because it is much more difficult for them to stop and start again. If you are coming across another biker pedaling uphill and you are heading downhill, it is courteous to step aside and let them pass.
Group Dynamics
Biking with friends is always a great time, the more the merrier. But having a large group can impose problems on other cyclists. Remember the trails are for everyone and that we must share them with others. When cycling along a path remind your friends to bike in a single-file line to avoid taking up the entire path. That way other cyclists have room to maneuver.
Additionally, it’s common for the leader of the group to warn oncoming bikers that you have a large group behind you. For example, me and my friends Jonathan, Michelle, and Celeste go out for a bike ride and I am the leader. If I see another biker headed our direction, I will tell them, “Hello! I’ve got 3 more bikers behind me.” That warns them about my friends behind me, and it is especially important on tight blind corners where cyclists can run into each other.
Now you’re ready to take on the world of mountain biking! Have fun out there and be safe!