

 myCSUSM






Using Poll Everywhere
Poll Everywhere is an online polling tool that allows you to engage your students by asking them questions during your synchronous course session. Students can respond to these questions using their smartphone or computer.
Poll Everywhere is integrated into Cougar Courses, which allows the course roster to sync with Poll Everywhere and allows grades to be easily pushed from Poll Everywhere to Cougar Courses.
- Creating a Presenter account in Poll Everywhere
- Connect your Canvas course to Poll Everywhere
- Securing your polls
- Creating assignments in Poll Everywhere
- Have your students set up their Poll Everywhere accounts
- Push Poll Everywhere grades to your course
Creating a Presenter account in Poll Everywhere
- To create your Poll Everywhere account visit: Poll Everywhere and enter your CSUSM email address and click Next. Note: You must use your CSUSM email address in order to create a presenter account.

- Click the Log in with CSUSM button.

- This will take you to our CSUSM log in page. Enter your CSUSM credentials. You will
then be taken to the Home page in Poll Everywhere where you can begin creating polls.

Connect your course to Poll Everywhere
- Ensure your course in Cougar Courses has the appropriate start and end dates. On your
course navigation click on Settings, then scroll to the Participation section of the
page. We provide default Start and End dates. Those dates will work with Poll Everywhere.
However, if you changed the Participation setting from the default of Term to Course,
make sure you set your Start and End dates. The Start date should be in the past and
the End date should when final grades are due or later. If you updated either date,
scroll to the bottom and click "Update course details."

- Ensure your course is published to students. If you are not ready to publish your
course yet, you will need to wait to connect your course to Poll Everywhere until
after it is published.

- Once you have verified your course dates and published your course, go back to the
Settings page and click the Navigation tab at the top.

- Click and hold on the “Poll Everywhere” link and drag it up to the top group to add
it to the Course Navigation. Note: Students will not be able to see this link in the course.

- Once you have moved it, scroll to the bottom of the page and click the “Save” button to save your changes.
- You should now see a Poll Everywhere link in the course navigation. Click on the link
to begin setting up your course in Poll Everywhere.

- In the new tab, click the button "Continue to csusm.instructure.com."

- Click the button "Sync roster" to import the students from your course into Poll Everywhere.
Note: You must sync your roster in Poll Everywhere before you have students participate
in your polls.

- Click the Participants tab in the left-hand side navigation. Once on the participants
page, you will be able to verify that the import took place because your students
will be listed. It may take a few minutes for them to show up.

- If you establish the connection to Poll Everywhere prior to the add/drop deadline, you will want to resync your Poll Everywhere roster as students add or drop your course.
- Create your activities and assignments in Poll Everywhere.
Securing your polls
Before creating your polls/activities, we recommend enabling the setting “Restrict to registered participants only” in order to ensure that only your registered students respond to your polls. This ensures the grades sync with your Canvas course and you can see how each student responded.
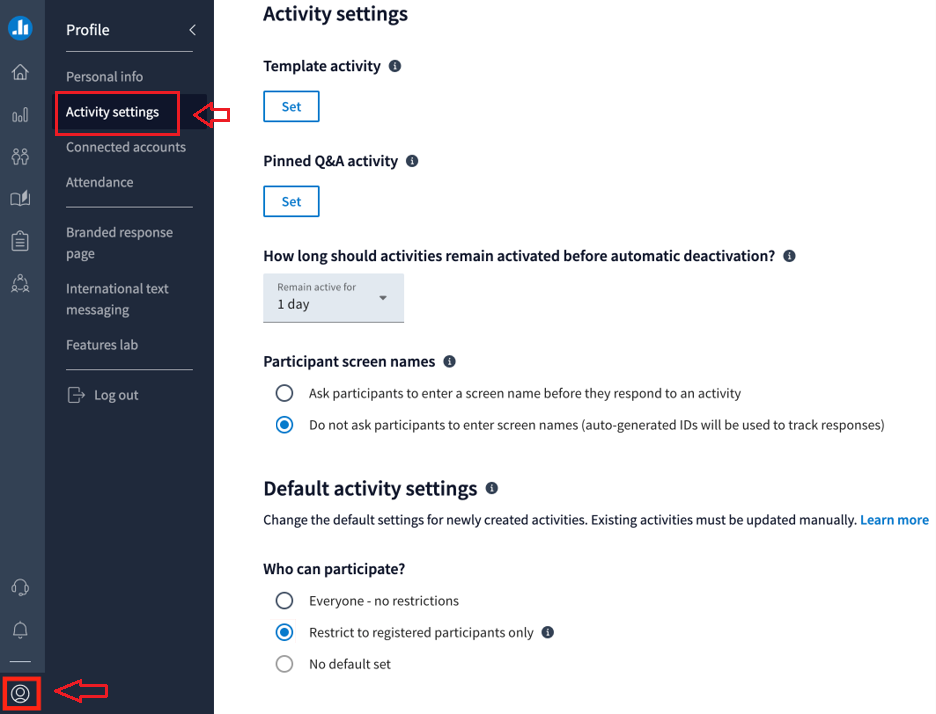
- To set this setting as the default for all activities you create, go to your profile
(person icon in the lower left) and click Activity Settings.
- Under “Participant screen names” select “Do not ask participants to enter screen names (auto-generated IDs will be used to
track responses)" and under “Who can participate” select “Restrict to registered participants only”.
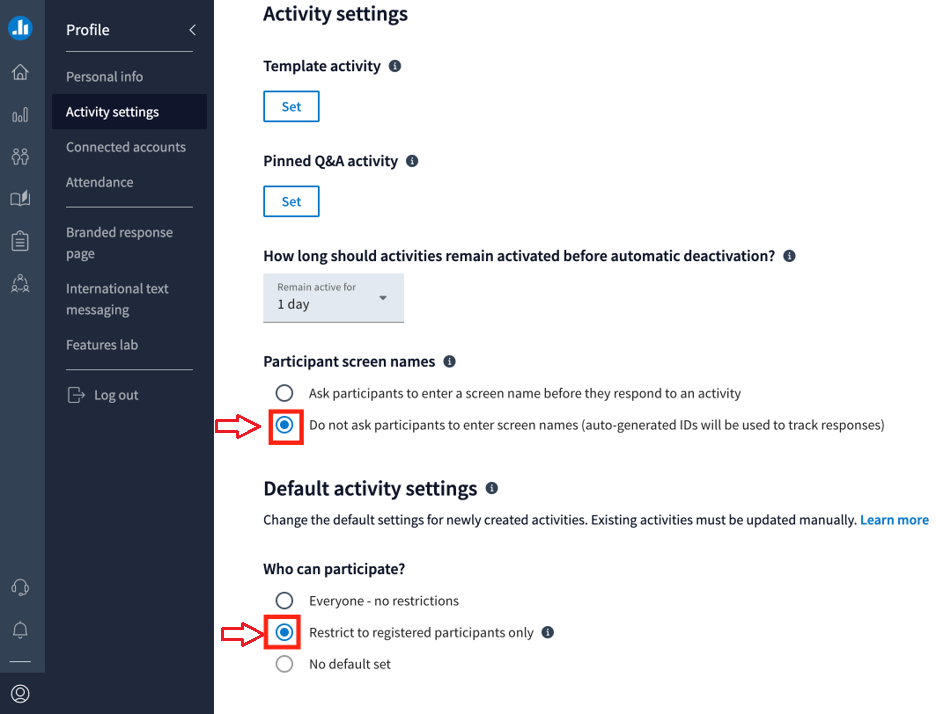
- Your future polls will now be restricted to only registered students. This means you will want to resync your roster regularly until the add/drop deadline to ensure all students are on your roster.
Allow an individual activity to be anonymous
There may be times when you want a poll to be anonymous. Keep in mind if you make a poll anonymous, it will anonymize all past, present, and future responses for that activity. Therefore, if you would like to make an existing poll anonymous we recommend you duplicate the poll first and make the duplicate anonymous in order to not lose any past data. Please use caution when making polls anonymous as there is no way to find out which participants responded.
- To modify this setting for an activity, open the poll you have created and click “Audience restriction & identity” on the right to expand the selection.
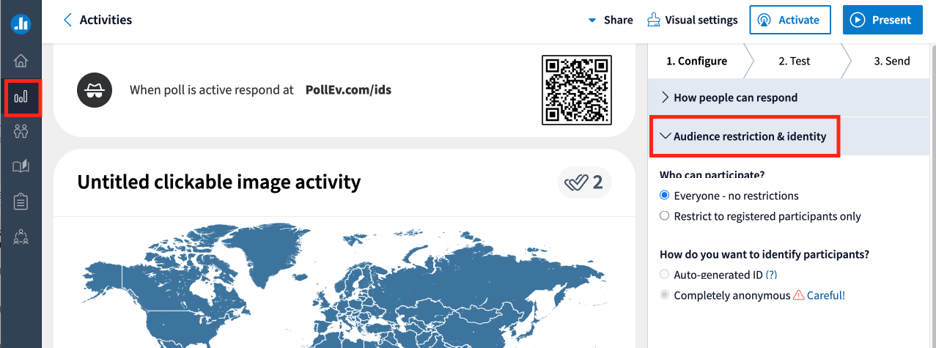
- Under “Who can participate” you can select “Everyone- no restrictions” and under “How do you want to identify participants” you can select “Completely anonymous”.
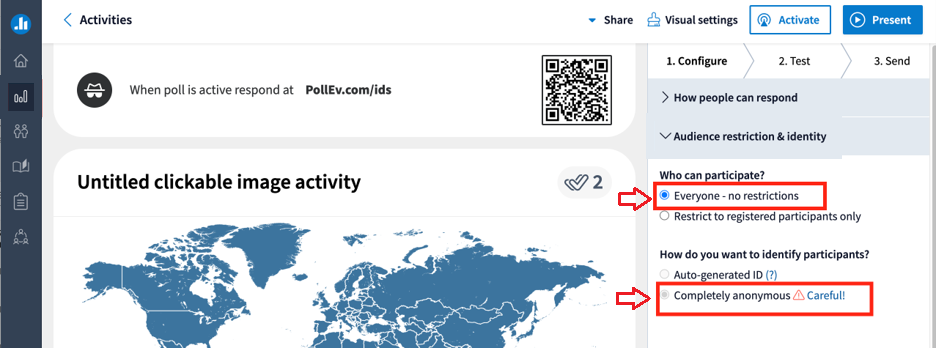
If you do select “Completely anonymous” you will receive the following warning: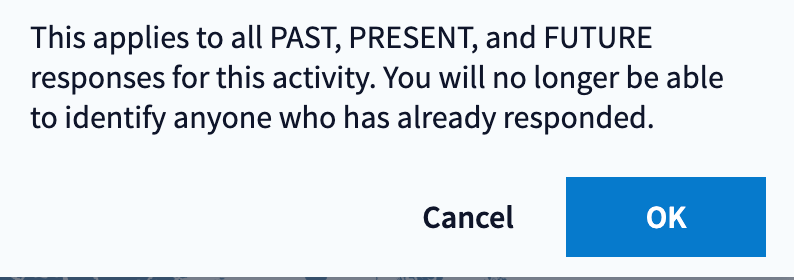
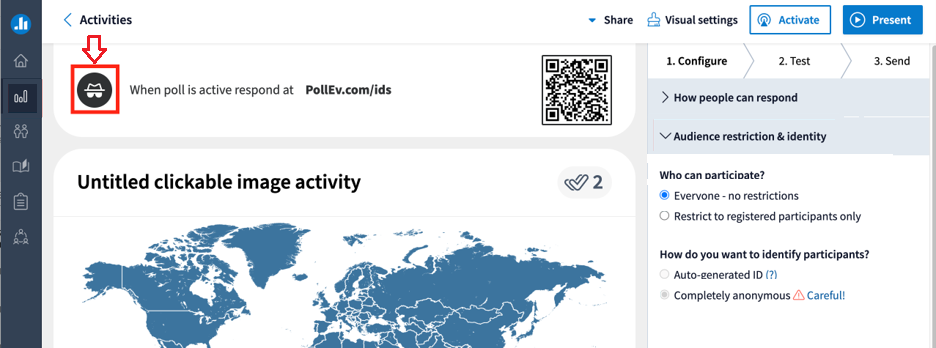
Therefore, if you would like to make an existing poll anonymous we recommend you duplicate the poll first and make the duplicate anonymous in order to not lose any past data. - You will know the poll is anonymous by the icon that appears next to the join link.
Creating assignments in Poll Everywhere
You must sync your roster in Poll Everywhere before you have students participate in your polls. You do not have to create your assignment before students participate.

For full instructions on how to set up assignments and polls please refer to Poll Everywhere’s Creating Assignments section in their Getting Started with Course
Management guide.
Have your students set up their Poll Everywhere accounts
- Students need to have Poll Everywhere accounts using their CSUSM emails in order for you to accurately sync your Poll Everywhere to your gradebook.
- Provide this guide to your students to walk them through how to create their Poll Everywhere accounts and join your Poll Everywhere sessions
Pushing Poll Everywhere grades to your course
Once you have set up your assignments and students have participated, you can sync grades for those assignments.
- Go to Poll Everywhere using the link in your course navigation.
- Click the “Sync Grades” button next to the assignment you want to add to your course.
This will create the assignment in Cougar Courses and bring over the grades.

Warning: If you click the “Sync Grades” button for any assignment that students have not yet participated in, the gradebook in Cougar Courses will show a 0 for every student for that assignment, so you will want to wait until students have participated in the polls before syncing grades. If you no longer need an assignment, delete the assignment from Poll Everywhere first and then from your course in Cougar Courses.
Additional Poll Everywhere Resources
- Poll Everywhere Support Center
- Poll Everywhere Applications (to embed Poll Everywhere in PPT, Keynote, Google Slides, etc.)
- Poll Everywhere Instructor Guide