myCSUSM


Create Groups and Groupings
Why Do This
You can use groups in a variety of ways within Community. For example, if the participants are creating projects within groups, setting up a group Assignment allows them to submit and be graded as a group. Also, breaking up participants into smaller groups within a Forum can help increase participation and interaction. Beyond having participants working within groups, you can also use groups to restrict access to resources and activities to particular sets of participants. Groups can either be auto-created by the system, manually created, or participants can create and self-select their own groups. You can have as many sets of groups in a course as you want; however, you will need to create Groupings to distinguish between these sets of groups.
Contents
- Auto-Create Groups
- Create Groups Manually
- Edit a Group
- Add/Remove Users of a Group
- Create Grouping
- Add Groups to a Grouping
Auto-Create Groups
Even if you are manually adding participants into their groups, you can still use the auto-create feature to bulk create the empty shells.
- Click on the Administration settings dropdown (gear icon) at the top right in your course, then select Users and then Groups.

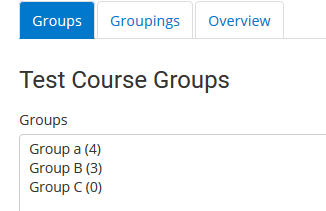
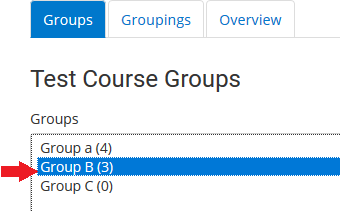
- Groups already created will be listed in the Groups box. Group shells are copied over during the Import process, so you might need to delete any unused and unwanted group shells. The number in parenthesis is the number of members in that group.
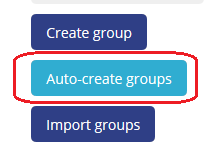
- Click the Auto-create Groups button.
- For Naming scheme, use # to name groups numerically or @ to name groups alphabetically. For example, “Project Group #” will result in groups called Project Group 1, Project Group 2, etc., while “Project Group @” will result in groups called Project Group A, Project Group B, etc. You can always change the individual name of a group once the groups are created.
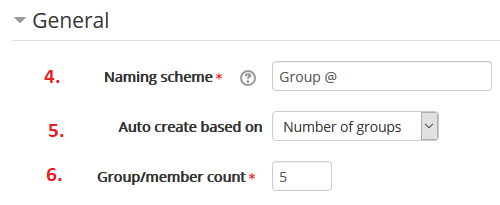
- For “Auto create based on” setting choose “Number of Groups” if you know the total number of groups you wish to create, or choose “Members per group” if you know how many participants you want per group.
- In the Group/member Count box, depending on what you set for the previous setting, enter in either the number
of groups to be created or the number of participants per group.
Group messaging: If set to Yes, participants can message their group members all at once from within their individual Messages area in Cougar Courses.
- Set “Select members with role” to Participant.
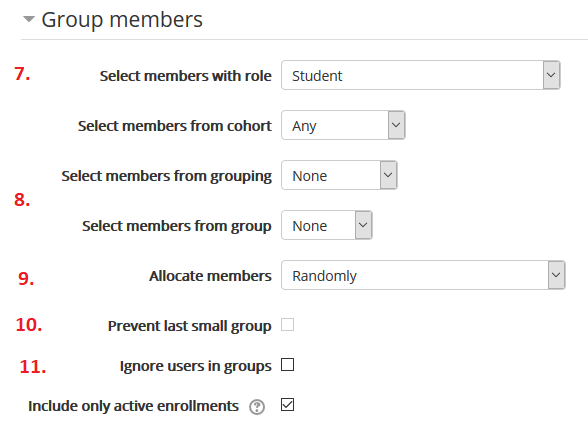
- Optional: The two settings “Select members from grouping” and “Select members from group” allows you to create groups with enrollments based on an already existing Grouping or Group. For example, if you have a combined container you might already have each section in their own Group. With this setting you can create groups from each of these section groups so that participants are only in groups with other participants in their section. Otherwise, keep the default None.
- For Allocate Members, choose “No allocation” if you want the shells to be created, but you will be manually adding participants. Choose “Randomly” if you want the system to randomly add participants to the groups. You can also choose to have them automatically added based on first name, last name, or ID number.
- Check the box for “Prevent last small group” to ensure you don’t end up with a group of only a few participants. For example, if you have your 31 participant course divided up into groups of 6, this setting would place that leftover participant into one of the other groups, rather than into their own group of just one.
- Optional: If you are only creating groups for participants that are not yet in a group, you can check the box for “Ignore users in groups” to prevent the system from adding participants who are already in a group.
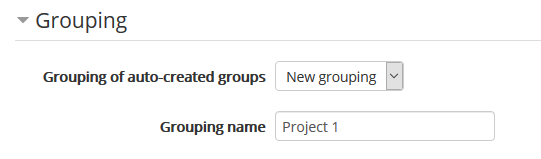
- If you are going to have more than one set of groups in your course (for example, one set of groups for Project 1 and a different set of groups for Project 2), you will need to use Groupings to distinguish between the two sets of groups. If you have already created the Grouping for this set of groups, choose it from the dropdown for “Grouping of auto-created groups.” If not, select “New Grouping” and enter the Grouping name in the provided box.
- Click Preview to preview the groups (and group members) and click Submit when finished.

Note: If participants are added to your course container after groups are created these participants will not be automatically added to a group, they must be manually added.
Create Groups Manually
If you only need to create a small number of groups, and you don't want the system to add participants, you can manually create groups one at a time.
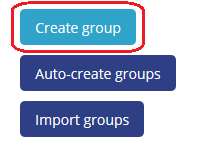
- In the Administration block in your course, click Users and then Groups.
- Click the Create Group button.
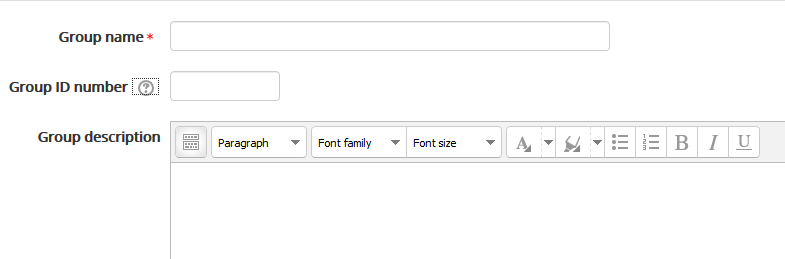
- Enter a Group name and, if desired, a brief description.
- If you are creating groups to use for Self-Enrollment in Community, enter the Enrollment Key for this group. Otherwise, leave this blank.

- Group messaging: If set to Yes, participants can message their group members all at once from within
their individual Messages area in Cougar Courses.
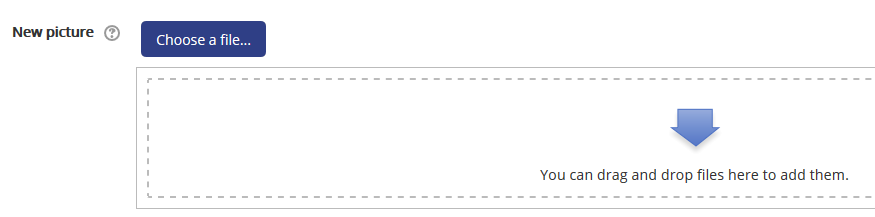
- Optional: upload a picture for the group.
- Click the Save changes button.

- Repeat for each additional group you wish to create.
Edit a Group
- In the Groups box, click on the Group you wish to edit.
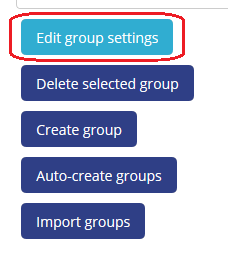
- Click the “Edit group settings” button.
- Make your edits.
- When finished, click Save changes.

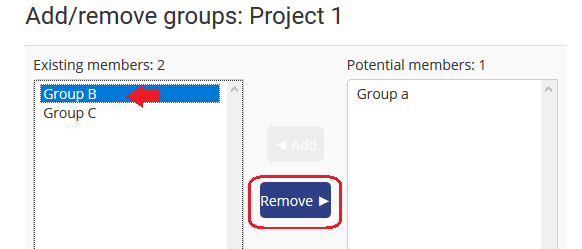
Add/Remove Users of a Group
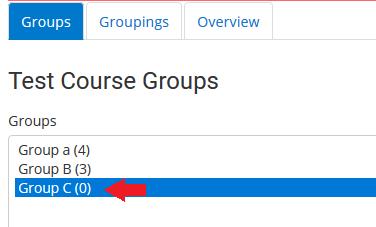
- In the Groups box, click on the desired Group.
- Click the “Add/remove users”

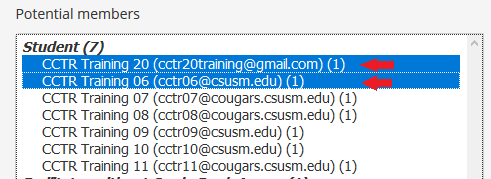
- All of the enrolled users in the course will be displayed in the Potential members box. The number in parenthesis next to a user's name is how many groups they are currently a member of. Click on the participant you wish to add to the group. To select multiple names, hold down the CTRL key (PC) or the Command /Apple key (Mac) while clicking the names.
- Click the Add button.
- The participants added will now appear in the Group Members box. To remove a participant, click on the participant and click the Remove button.
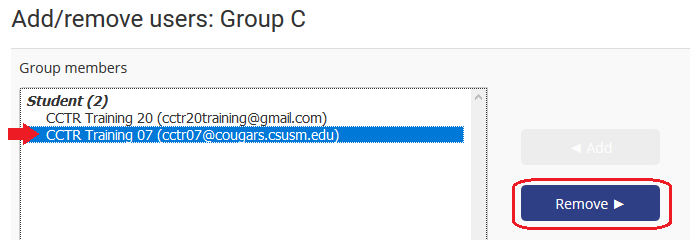
- Click the “Back to groups” button. Repeat steps above as necessary.

Create a Grouping
If you are going to have more than one set of groups in your course (for example, one set of groups for Project 1 and a different set of groups for Project 2), you will need to use Groupings to distinguish between the two sets of groups. If you didn't create the Grouping when you created the Groups, you can create the Grouping separately.
- In the Administration block in your course, click Users and then Groups.
- Click the Groupings tab.

- At the bottom of the page, click the Create grouping button.

- Enter the Grouping name and brief description, if desired.
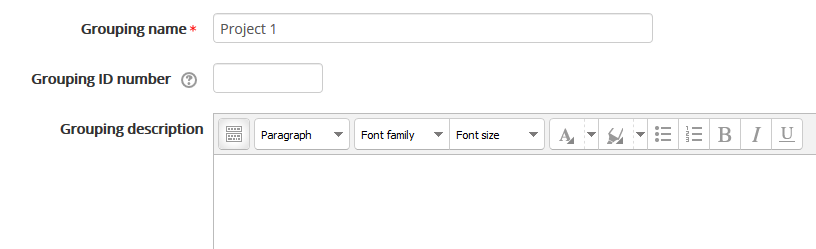
- Click the Save changes button.
Add Groups to a Grouping
- While on the Groupings tab, go to the Grouping you want to add groups to and in the Edit column click the “show groups in grouping” icon.

- In the “Potential members” box, click on the group that you want to add to the Grouping. To select multiple names, hold down the CTRL key (PC) or the Command /Apple key (Mac) while clicking the names. Click the Add button.
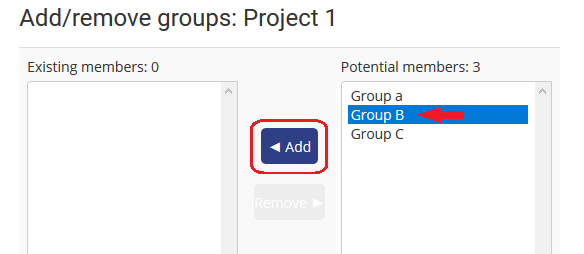
- The added groups will then be displayed in the “Existing members” box. To remove a group, click on the group and click the Remove button.
- Click the "Back to groupings” button. Repeat for each Grouping.