
 myCSUSM


Securing Zoom Meetings
Recommendations
Besides the standard practices of planning a Zoom meeting and checklist for webinars it is important to keep your Zoom updated and secure your sessions with the following setting options.
- Use a unique meeting ID and set a meeting password
- Avoid hosting meetings or ‘public’ events using your Personal Meeting ID (PMI). Your PMI is like your phone number used for repeated or continuous meetings. You don't want trolls invading your personal virtual space. Instead, Zoom suggests creating new meetings using random meeting IDs for meetings.
- While scheduling a meeting, under Meeting Options, check Require Meeting Password, then specify a strong password (make your password at least eight characters long and use at least three of the following types of characters: lowercase letters, uppercase letters, numbers, symbols). Participants will be asked for this password in order to join your meeting.
- Enable waiting rooms & lock sessions
- Zoom recommends enabling "Waiting Rooms" to secure your meetings.
- The Waiting Room is just like it sounds: It’s a virtual staging area that prevents people from joining a meeting until the host is ready. Meeting hosts can customize the Waiting Room settings to gain further control over which participants join a specific meeting and when.
- Waiting Rooms are especially beneficial for securing meetings that use your PMI because they provide added visibility into who’s trying to join.
- Lock the session once expected participants have arrived.
- The Zoom Host Controls allow the host or co-host to lock the meeting. Once all your attendees have joined:
- If the Participants panel is not visible, select Manage Participants at the bottom of the Zoom window.
- At the bottom of the Participants panel, select More.
- From the list that appears, select Lock Meeting.
- Unlock the meeting following these same steps.
- When a meeting is locked, no one can join, and you (the host or co-host) will NOT be alerted if anyone tries to join, so it's best not to lock the meeting until everyone has joined.
- The Zoom Host Controls allow the host or co-host to lock the meeting. Once all your attendees have joined:
- Disable Screen Sharing
- Prevent others from screen sharing during your meeting without permission. Login to https://zoom.csusm.edu -> Settings (navigation on the left) -> In the navigation, select "In Meeting (Basic)" -> scroll down to the 13th heading titled "Screen sharing" and make sure "Who can share?" is "host only" and "Who can start sharing when someone else is sharing" is "host only" -> changes are saved automatically.
-
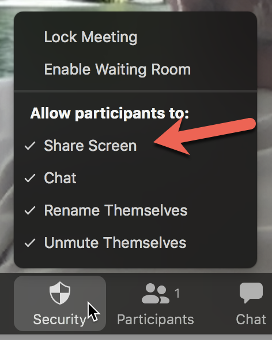
You can enable/disable participant screenshare in the meeting by clicking on the Security button on the navigation bar and selecting the desired option.
- Review Security Button Options
The meeting host has a Security option in their meeting controls, which exposes all of Zoom’s existing in-meeting security controls one place. This includes locking the meeting, enable/disable participant screen share, prevent particpants from unmuting themselves, and enable/disable chat. Users can also now enable Waiting Room in a meeting, even if the feature was not turned on before the start of the meeting. For more information, please visit this recently published Blog.
Additionally, the Zoom Meeting ID will no longer be displayed on the title toolbar. The title will simply be “Zoom” for all meetings, preventing others from seeing active meeting IDs when, for instance, Zoom screenshots are posted publicly. The meeting ID can be found by clicking on Participants, then Invite
 or by clicking on the info icon at the top left of the client window
  .
.
Security Things You Can Do During A Meeting
While the best scenario is to keep disruptive persons out of your meeting to begin with, if your meeting is being disrupted, there are things you can do to minimize the disruption.
- Mute individual
A participant could be saying something or simply making noise. You can Mute the individual person. The Mute button next to each person’s name in the Participants window.
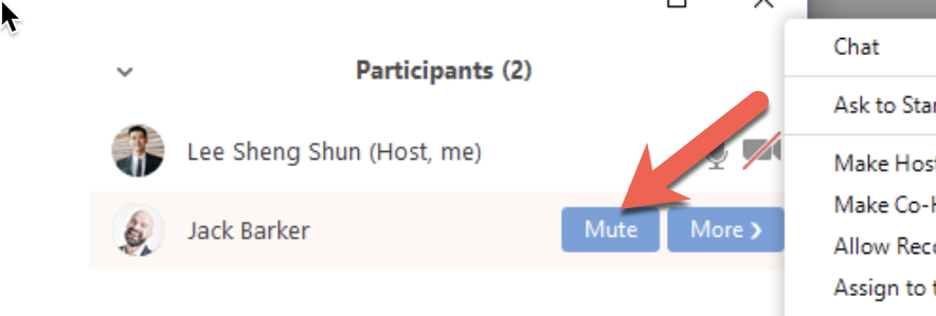
- Mute everyone
Mute All – if you’re not sure who’s making the noise. The Mute All button at the bottom of the Participants window.
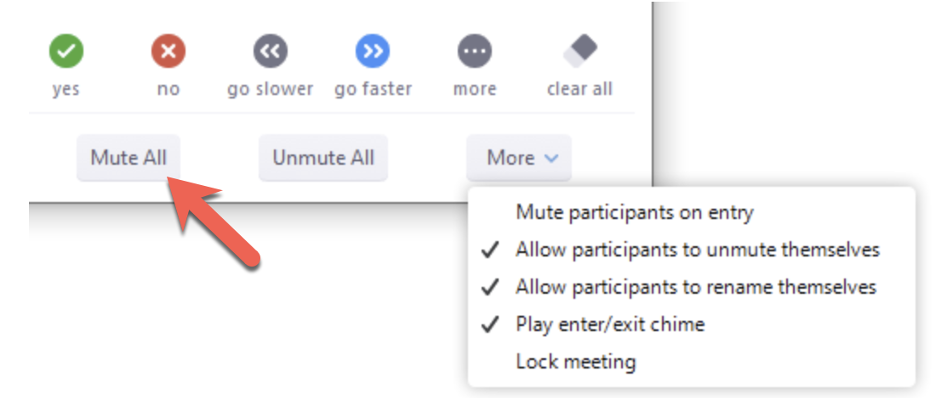
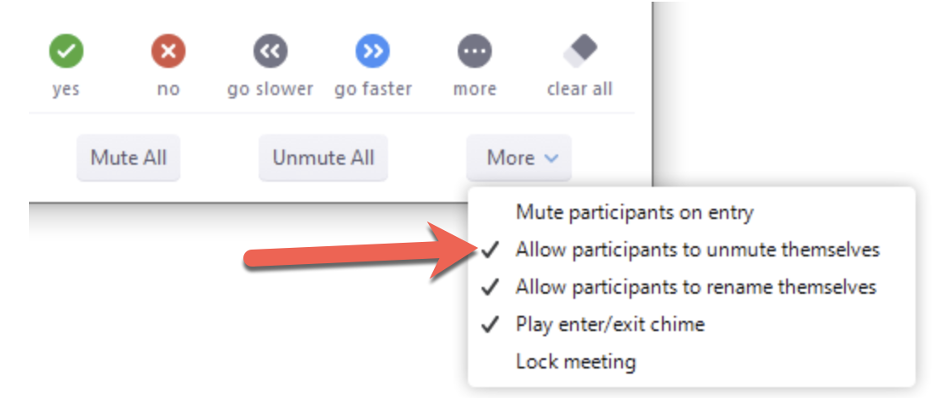
- Prevent participants from unmuting themselves
Remove participants’ ability to unmute themselves. The More menu at the bottom of the Participants window. At this point you, as Host, are the only person that can unmute someone.
- Turn off participant's video
A participant could have something offensive in their webcam video or in their virtual background. Mute the video of a participant. The small camera icon next to each person’s name that allows you to turn their camera off.
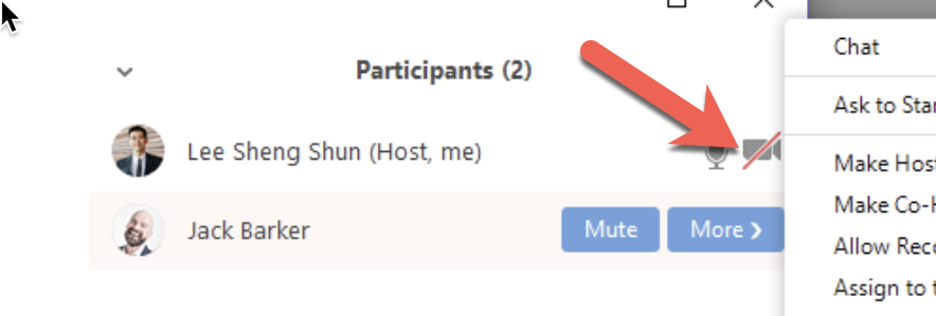
NOTE: Participants can turn their video back on. You cannot prevent this.
- Screen share
One of Zoom’s basic capabilities is screen sharing, but someone may attempt to share something objectionable. You can stop anyone from sharing their screen unless you allow it.
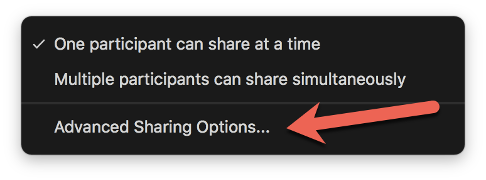
Advanced Sharing Options under the Screen Sharing menu at the bottom center.
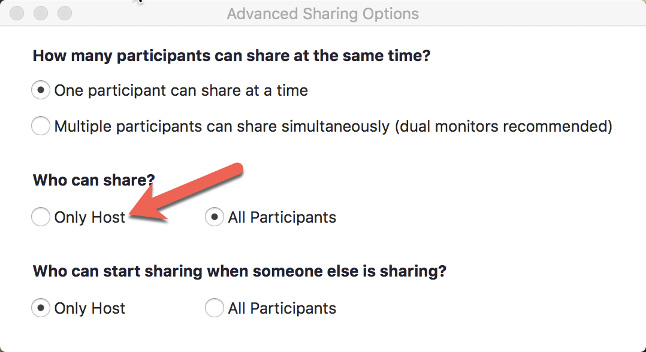
With this selected, only you – the host – can screen share.
Prevent screen share during a meeting
This can also be done in the Security menu, available at the bottom of the screen.
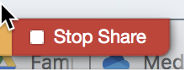
Stop screen share during a meeting
Stop a screen share already in progress. While someone is sharing, this button is at the top of the screen. Click it to stop the share.
- Disable "Join Before Host" (Not needed if waiting rooms is enabled)
If you are scheduling a meeting where sensitive information will be discussed, we recommend leaving Enable join before host (found in the Meeting Options section while scheduling a meeting on the webpage, or in the Advanced Options if scheduling via the Zoom application) turned OFF. See Zoom's Join Before Host help page for more information.
The join before host option can be convenient for allowing others to start or continue with a meeting if you (the host) are not available. In order for other attendee to become the host and gain full control of the meeting, the Claim Host option located at the bottom of the participants list must be used. When using this option, the host key is required. The host key is located on the host's main profile and has to be shared with the participant that will use this option.
As an alternative, we recommend assigning an Alternative Host
It is still possible for a meeting to start with you (the host) even with Join Before Host disabled. If you have given someone Scheduling Privilege (which allows them to schedule meetings on your behalf), when that person joins a meeting before you, the meeting will start and they will be made the host. This is typically not a problem, as our recommendation to disable Join Before Host is based on preventing unwanted/uninvited participants from hijacking a meeting. After you join, the role of Host can be reassigned to you.
- Disable AnnotationYou and your attendees can doodle and mark up content together using annotations during screen share. If you do not have a need for this feature to be on, you can disable it in the Zoom settings profile to prevent people from writing all over the screens. Once you login to Zoom you can find the slider to disable the setting under Personal Settings -> In Meeting (Basic) -> Annotation.
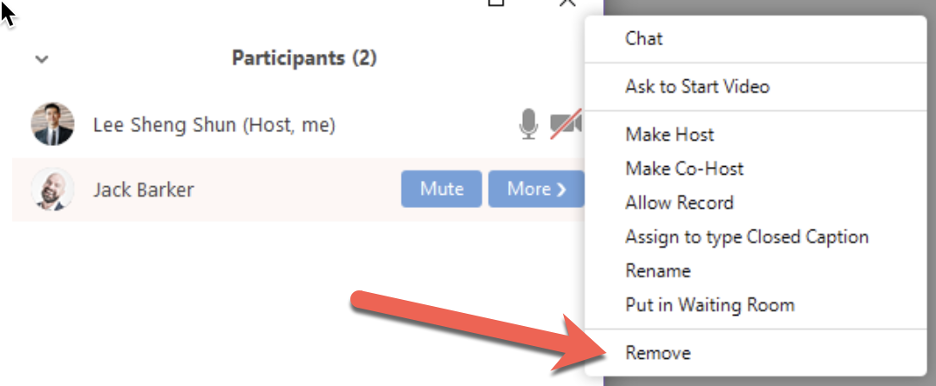
- Remove disruptive participant in meeting
If you have already begun a session and find an unwanted attendee has joined:
- If the Participants panel is not visible, select Manage Participants at the bottom of the Zoom window.
- Next to the person you want to remove, select More.
- From the list that appears, select Remove.
- Prevent removed person from reentering
This tutorial shows you how to prevent people you have removed from meetings from reentering: https://support.zoom.us/hc/en-us/articles/36002185137