
 myCSUSM


Feedback
Why use this?
Feedback allows you to survey your students. Feedback surveys can be anonymous or not, can allow for a single response or multiple responses (from anonymous users), and can either display the results to students or remain private. Question types include Short Text Answer, Longer Text Answer, Multiple Choice, and Numeric Answer.
It is very similar to another activity called Questionnaire. The main difference is that with Questionnaire you can have the system automatically award points to students for taking the survey, while Feedback is completely ungraded. For more information, please see our help guide on Questionnaire.
Feedback Settings
Click on the Create Learning Activity link at the bottom of the section/topic in which you would like the Feedback to appear.
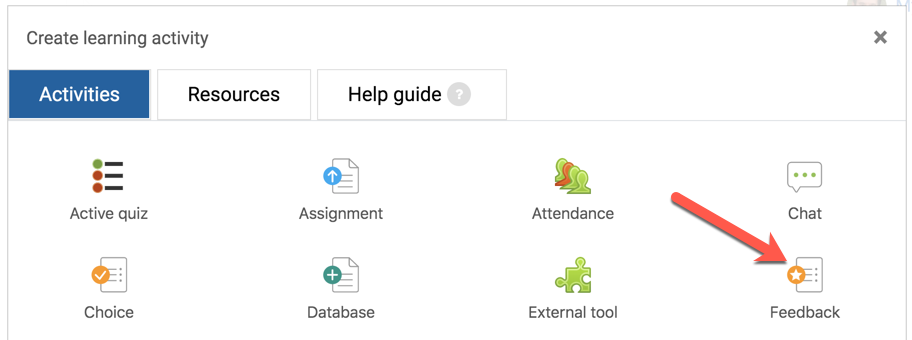
Click on the Feedback icon.
Give this survey a Name and Description.
On the right side there are sections of settings that allow you to adjust various choices about how the survey will work.
Availability
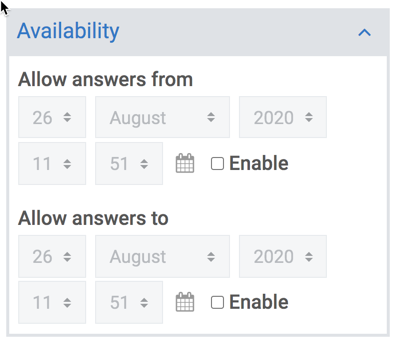
Allows you to set open and close dates and times for the survey.
Question and submission settings
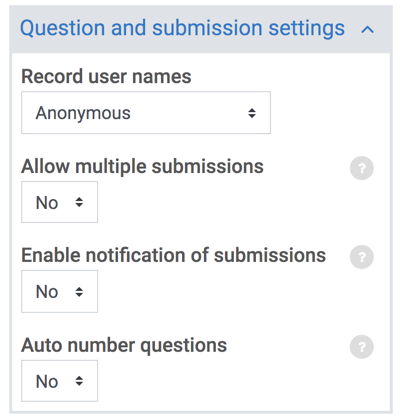
- Record user names - set whether user names will be recorded or anonymous.
- Allow multiple submissions - If the above is set to Anonymous, allowing multiple submissions means each student
can take the survey an unlimited number of times. If the above is set to log user
names, allowing multiple submissions means students can edit their submission. If
you wish to log user names and allow students to take and submit multiple times, you
will want to use the Questionnaire tool.
- Enable notification - if turned on, you will be notified when students submit.
- Auto number questions - enables or disables automatic numbering of survey questions.
After submission
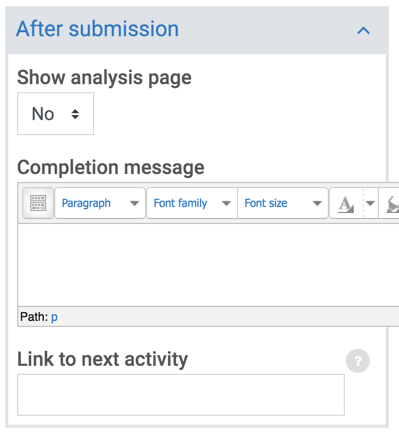
- Show analysis page - If set to Yes, students will be able to see the summary results. If set to No, only the instructor will see the summary results.
- Completion message - a message the student will see upon submission.
- Link to next activity - if left blank, students will be re-directed back to the course homepage.
When finished, click Save & Display.
Edit Questions
Use the Edit Questions tab to add and edit questions.
Add Question
Choose the desired question type from the "Add question" dropdown.
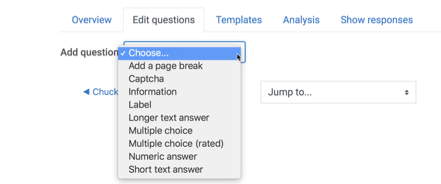
Question Types
- Add a page break
Use to insert a page break within a survey.
- CaptchaDo not use.
- InformationDisplays the course name in the data for the submission. It is does require any input from the student. You would only use this question type if you are exporting the data to Excel and combining with data from another course.
- Label
This is not a question, but allows you to enter text to be displayed to users. This can be used to introduce a series of questions, provide instructions, etc.
- Longer Text Answer
Allows a student to enter text (longer than a word or phrase).
- If an answer is required, check the box for Required.
- Enter the question in the Question box.
- Add the question name, if desired, in the Label box.
- Choose the Width of the response box.
- For the Number of lines choose how many lines you want available for the response box.
- If you want all students to see this question, no matter their previous answers, just ignore this next setting. However, if you only want students to see this question if they gave a specific answer to a previous question, then for Dependence Item choose the previous question and then set the dependence value (the answer that would direct them to this question).
- Set the Position, which is the question number. For example, if you want this to be the first question, set the Position to 1.
- When finished, click Save question.
- Multiple Choice
Allows a student to either select one option from a list, or multiple options from a list.
- If an answer is required, check the box for Required.
- Enter the question in the Question box.
- Add the question name, if desired, in the Label box.
- Choose the Multiple Choice Type. Single Answer will allow a student to select one answer option. Multiple Answers will allow a student to select more than one answer option. Single Answer Allowed (drop-down menu) will allow a student to select one answer option from a drop-down.
- If you chose Single Answer or Multiple Answers in the previous step, choose how you want the answer options displayed, whether vertically or horizontally.
- If you chose Single Answer in step 4, choose whether or not you wish to hide a “Not selected” option from students.
- If this question is not required, choose whether or not you want to include empty submits in the analysis.
- Type the answer choices in the Multiple Choice Values box. List one answer choice per line.
- If you want all students to see this question, no matter their previous answers, just ignore this next setting. However, if you only want students to see this question if they gave a specific answer to a previous question, then for Dependence Item choose the previous question and then set the dependence value (the answer that would direct them to this question).
- Set the Position, which is the question number. For example, if you want this to be the first question, set the Position to 1.
- When finished, click Save question.
- Multiple Choice (rated)
Similar to Mutliple Choice, but assigns a numerical value to each answer option. An average of the responses is calculated and displayed along with the graphical analysis of the question.
- If an answer is required, check the box for Required.
- Enter the question in the Question box.
- Add the question name, if desired, in the Label box.
- Choose the Multiple Choice Type. Single Answer will allow a student to select one answer option. Single Answer Allowed (drop-down menu) will allow a student to select one answer option from a drop-down.
- If you chose Single Answer in the previous step, choose how you want the answer options displayed, whether vertically or horizontally.
- If you chose Single Answer in step 4, choose whether or not you wish to hide a “Not selected” option from students.
- If this question is not required, choose whether or not you want to include empty submits in the analysis.
- Type the answer choices in the Multiple Choice Values box. List one answer choice per line. Before each option indicate the numerical with the number followed by a forward slash.
- If you want all students to see this question, no matter their previous answers, just ignore this next setting. However, if you only want students to see this question if they gave a specific answer to a previous question, then for Dependence Item choose the previous question and then set the dependence value (the answer that would direct them to this question).
- Set the Position, which is the question number. For example, if you want this to be the first question, set the Position to 1.
- When finished, click Save question.
- Numeric answer
Allows a student to enter a number within a set range. An average of the responses is calculated and displayed in the analysis of the question.
- If an answer is required, check the box for Required.
- Enter the question in the Question box.
- Add the question name, if desired, in the Label box.
- Set the desired range for responses in the Range From and Range To fields.
- If you want all students to see this question, no matter their previous answers, just ignore this next setting. However, if you only want students to see this question if they gave a specific answer to a previous question, then for Dependence Item choose the previous question and then set the Dependence Value (the answer that would direct them to this question).
- Set the Position, which is the question number. For example, if you want this to be the first question, set the Position to 1.
- When finished, click Save question.
- Short text answer
Allows a student to enter a small amount of text (word or short phrase).
- If an answer is required, check the box for Required.
- Enter the question in the Question box.
- Add the question name, if desired, in the Label box.
- Choose the Width of the response box.
- Set the Maximum characters accepted.
- If you want all students to see this question, no matter their previous answers, just ignore this next setting. However, if you only want students to see this question if they gave a specific answer to a previous question, then for Dependence Item choose the previous question and then set the Dependence Value (the answer that would direct them to this question).
- Set the Position, which is the question number. For example, if you want this to be the first question, set the Position to 1.
- When finished, click Save question.
Analysis
Click the Analysis tab to view a graphical summary of the results of each question.
Show Responses
Click the Show Responses tab to view each individual response to the survey.