myCSUSM


Setup Appointments Using Scheduler
Why Do This
The Scheduler activity is an efficient way to create a schedule of specified time slots for meetings, appointments, or student presentations. Students then choose a time slot. Each time slot can be set to accommodate one or several students, and it is possible to schedule appointments for entire groups at the same time. Instructors can also select a time slot for students. The scheduler also allows you to record the outcome of the meeting - and optionally a grade - within the scheduler.
Creating a Scheduled Activity
- Log into Cougar Courses and go into your course.
- Go to the topic/module where you wish to add the Scheduler.
- Click the "Create learning activity" link at the bottom left of the topic.
- Scroll down the list of Activities and select Scheduler.
- On the Adding a new Scheduler page:
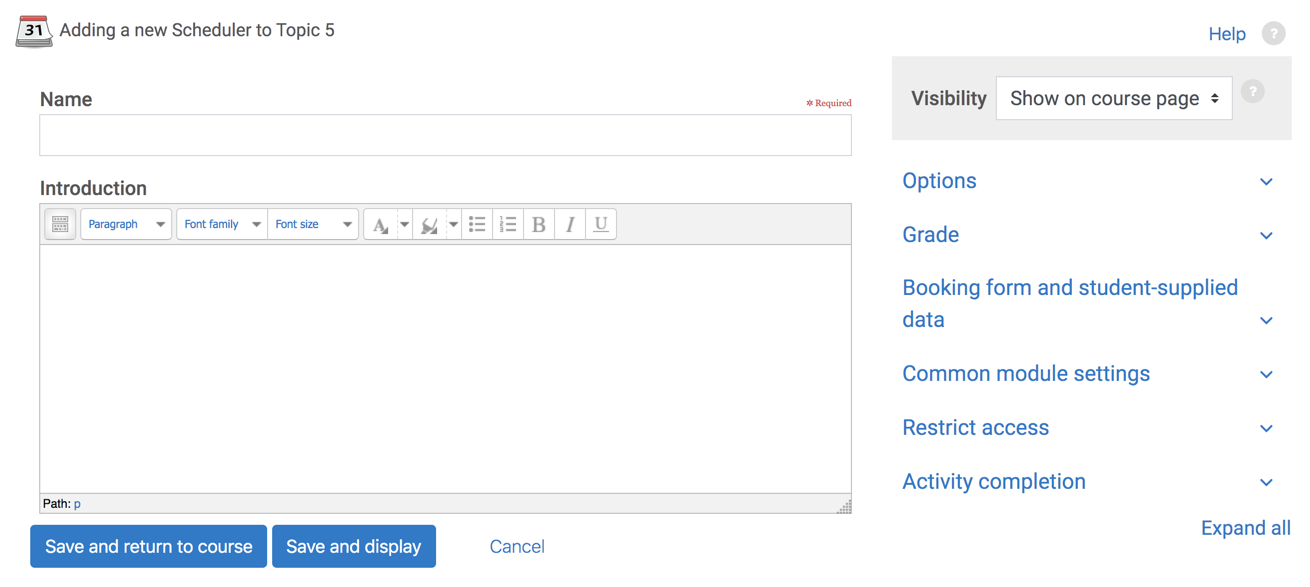
- Name: Enter a name for the scheduler.
- Introduction: Type any instructions about the sign- up sheet and/or the activity in the Instructions box.
- Options:
- Mode: Set the number of appointments you want each student to be able to make (either for the whole Scheduler or at a time).
- Booking in Groups: If set to Yes students can book a slot for all members of their group.
- Guard time: Optional. If enabled, prevents students from changing or selecting appointments a certain amount of time before the appointment. For example, if the Guard time is 2 hours, students cannot cancel their appointment if it is less than two hours away. Also students wouldn't be able to book an appointment less than two hours away.
- Default slot duration: enter the amount of time allotted to each appointment.
- Grade: Choose if they will receive a grade for their appointment(s). If not, leave Type as None.
- Click the "Save and display" button.
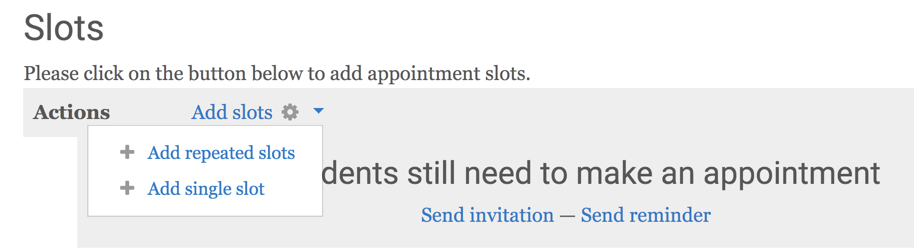
- On the Slots page click on "Add slots" and then choose either "Add repeated slots" or "Add single slot"
- On the “Add repeated slots” page:
- Date: Set the date of first slots.
- Repeat Time Slots Until: If all slots are on the same day, use the start date. To create slots at the same time on additional days, set the end date of last time slot.
- Add Appointments on: Check the day(s) of the week you wish to add slots. Note the slots will all be in the same time window each day (this is a 24 hour clock so 1:00 pm is 13).
- Select start time of first slot of the day and End time of last slot of the day.
- Divide into Slots? : If yes, will create multiple slots within the start and end times set above.
- Duration: Enter length of each slot within the time window set in start and end time. Add a break between slots if needed.
- Maximum number of students: Select the number of students who can sign-up for each time slot (typically 1). If they are in a group, leave it at 1 and tell the students one team member should sign-up for the whole group. Put in a location.
- Email a reminder: select how many days before the presentation students will receive an email reminder of their appointment.
- Click the Save changes button.
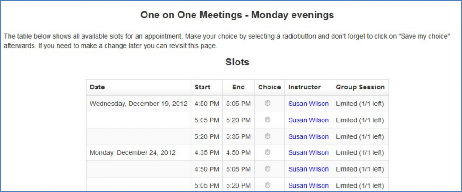
Student’s View